Backgrounds,
Clip Art and Graphics
The Background
Note: This
lesson is created for version 3.2 of HyperStudio for Windows.
Some features may not be present in the version you may have.
You may update your HyperStudio version for free at the HyperStudio
Update Library.
In creating
multimedia presentations, it is important to give some thought
to the background. In this portion of the lesson you will learn
to make standard colored backgrounds more interesting and unique.
Open HyperStudio
and save the new stack as bgs_1.stk in your folder. You can even
save it on a floppy or attach it to your Yahoo email and send
it home. It'll get there before you do! Remember, if you plan
to switch back and forth between Windows and Mac OS, it's a good
idea to get used to naming stacks with 8 or less characters and
the .stk extension.
From Ordinary
to Extraordinary
- To add
a colored background, go to Edit => Erase Background... and choose a color
other than white from the grid. Click OK. Your background is
erased with a color other than white.
- Now go
to Edit
=> Effects => Gradients. Notice that you have a choice of two colors
and four ways to display those colors. Choose two colors and
experiment with the four display options.
- Now go
to Edit
=> Effects => Brightness/Contrast... and notice that you can modify
the colors you created above.
- You can
do other snazzy things with Edit => Effects => Beveler... and Edit => Effects
=> Texture and
Edit
=> Effects => Emboss. You can (as you probably already discovered)
combine several or all of these effects into a pretty unique
background. These effects are similar to filters in paint and
graphic programs.
In this
next portion of this lesson, you will learn to import an image
as a background. Save your last stack and choose New Stack from
the File Menu. Save this new stack as bgs_2.stk in the appropriate
folder.
"Image
is Everything" 
- Go to
File
=> Import Background. HyperStudio will ask you if you want to
get your graphic from a Disk file. You click OK and you will
need to navigate through the hard drive or server to a folder
that contains graphics. HyperStudio will default to the last
folder you accessed. If you are using HyperStudio from a server,
navigate back to the HyperStudio folder to HS Art and you'll
find tons of great graphics there. You can also get graphics
from a CD file. You can get graphics from the web by right clicking
on an image and saving it to a folder that you access later.
- Choose
a graphic from a folder and click OK. HyperStudio will give you
the option of re-sizing the graphic to fit your screen. You should
try both options. Some look distorted when re-sized.
- Experiment
with lots of graphic backgrounds. You should also try some of
the filtering effects particularly "Beveler" and "Texture".
- Just a
note: Backgrounds don't move. Later we will add animation as
a graphic object. For now, think about backgrounds as aesthetically
pleasing space on which to create.
Grouping Backgrounds
The next
portion of this lesson shows you how to group your backgrounds
so that you only need to create one background that you might
want to use with several cards. I'll also show you how easy it
is to delete a background. Save your last stack and choose New
Stack from the File Menu. Save this new stack as bgs_3.stk in
the appropriate folder.
- Create
a background in this new stack and add special effects to satisfy
your aesthetic needs.
- Now go
to Edit
=> Ready Made Cards => Group Cards. HyperStudio
makes a new card with the same background. This not only saves
RAM on the computer or server, but it also saves you time. You
can group lots of different backgrounds. Essentially, what you're
doing is duplicating a card that you have prepared ahead of time.
Pretty cool! It's like having your own little Xerox machine right
there on your computer.
- Well,
let's say you don't like your background. It's easy to start
over with Edit
=> Erase Background as you learned above. You can also simply
import another background. Be aware, however, that if you erase
or import a background on a grouped card, the new background
may also be grouped. When you erase you are given a choice. When
you import, your new background is grouped. You can always go
to Edit
=> Delete Card
or Edit
=> Cut Card
if you want to start over.
- Save your
stack.
Clip Art
This next
portion of the lesson teaches you to add Clip Art to your stacks.
It is important to know that Clip Art is like a background in
that it is not a separate object. It is simply painted on the
background.
- Choose
New Stack from the File Menu. Save this new stack as clips_1.stk
in the appropriate folder.Go to File => Add Clip Art... and navigate to
a folder that has graphics in it.
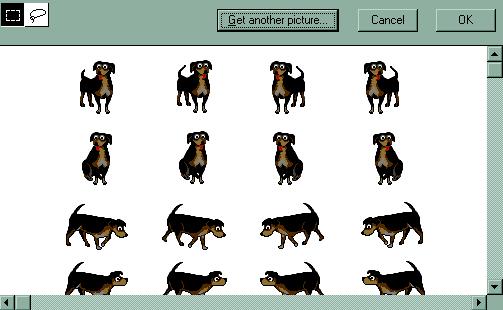
- Select
the graphic you want by using the rectangle selecting tool or
the lasso tool options and click OK. The image below shows what
the window looks like in HS Art if you select "Addy"
(Addy was Roger Wagner's dog). Save your work.
Imagine
getting your own clip art! You have lots of options.
- Go to
the web and get images by right clicking and saving the image
in an appropriate folder. Be sure to obey copyright laws.
- Buy a
Clip Art package from a retailer. HyperStudio supports gif and
jpeg images and a few others, but occasionally you'll get odd
results and crashes on PCs when a file format is unsupported.
This is part of the fun of multimedia!
- You can
download LView
Pro
from the web and do cool screen captures just like the one above.
Add them as clip art. I recommend doing this right away if you're
reading this at home and you have a Windows machine. On a Mac,
you simply press shift => command => 4 to do a screen capture.
Your image is saved as a PICT file right on your hard drive.
Then download Graphic
Converter,
open the captured picture, crop it and save it as a jpg image.
It's all free, boys and girls!
- You can
use the digital camera.
- You can
scan images.
- Later,
when the lab supports video capture, we will learn how to capture
a video frame. It's enough to give a grown man goose bumps!
Graphic Objects
This next
portion of the lesson teaches you to add Graphic Objects to your
stacks. It is important to know that Graphic Objects float on
top of the background. They are not part of the background as
Clip Art is. This also means that deleting Clip Art is not healthy
because part of your background will get deleted, too. You'll
see this below.
- Go to
Objects
=> Add a Graphic Object... and navigate to a folder that has graphics
in it.
- Select
the object you want by using the rectangle selecti
 ng
tool or the lasso tool options and click OK.
ng
tool or the lasso tool options and click OK.
- You won't
really notice the difference in Clip Art and Graphics until you
try and erase the graphic image you have added. Let's try it
now, for example.
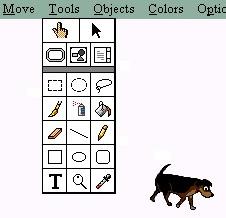
- Go to
Tools and select the
Eraser Tool. The Tools Palette is shown at the right, and the
Eraser Tool is just below the paintbrush. Try erasing the Graphic
Object you added. Add some Clip Art and erase it. You can do
that because, as I stated above, when Clip Art is added it becomes
part of the background. Graphic Objects are not part of the background.
This distinction will become very handy later.
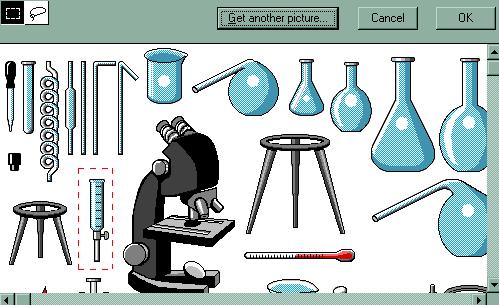
- The image
below shows what the window looks like in HS Art if you select
"Science". Notice the broken, red line around the piece
of equipment to the left of the microscope? Those who are sophisticated
in the use of HyperStudio call that line "Marching"
red ants. They move when you select something. In the example
below, I've used the rectangle selecting too. When this tool
is used, it grabs part of the background, too. If you choose
the lasso tool, only the object is selected. You'll appreciate
the importance of this when you're older.
So, what
if you want to delete a few things? There are several things to
know and a few options.
- First,
graphic objects delete nicely without wrecking your background.
This is one reason why it's important to know the difference
between Clip Art and Graphic Objects.
- Delete
a graphic object by selecting the Graphic Object Editing Tool
from the Tools Palette or Menu. It's the middle one in the second
row.

- Once you've
selected that editing tool, simply click on the graphic object
you want to delete. You'll see the "Marching" red ants
appear around the object. Hit "Delete" and it's gone
without affecting your background.
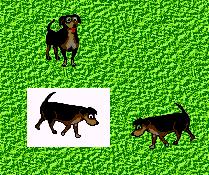
- In order
to delete Clip art, you need to select the Clip Art using the
rectangle, oval or lasso tools from the Tools Palette. Then,
when the red ants appear, hit delete and notice the effect. It's
scary, so save your work first! Below is an image of several
Addy dogs added as clip art and Graphic Objects. You can't tell
the difference until you try to erase or delete them. Notice
that the one with the white space around it was added without
using the lasso tool. The others were added with the lasso tool
which selects only the image, not the white space. See, you're
already getting older!
Animating
Graphic Objects
You can
animate any Graphic Object. There are several ways to animate,
but I will explain only one here, because much more will be done
with this later.
Go to Objects => Add
a Button...
and click OK. Click and drag the New Button to another part of
the screen and then click anywhere outside the button. You are
presented with some choices. Choose Play Animation by clicking
in the little box. In the next window select the lasso tool and
click on the image above the words "Current Card" to
select an object from the screen. Use the lasso tool to select
an image from the screen and follow the simple directions that
appear at the bottom of the screen. Don't worry if this gets confusing,
I'll demonstrate it in class. There are much better ways to animate,
but this has its uses. More later... when you're older.