|
Questions about FTP
|
 |
What is uploading?
- Uploading is what is done when files are transferred from a local computer to
a remote computer. Essentially, uploading means copying files from one folder to
another, except that the destination could be anywhere in the world.
Uploading is necessary so a world-wide audience can view sites created on a
local computer. In other words, only a limited audience can visit a site unless
it is given an address on a computer that others can access
from a local machine. When a site is uploaded to a computer connected to
the internet, it receives an address, called a URL (Uniform Resource Locator),
that anyone connected to the Internet can reach. Uploading requires a protocol known as file transfer protocol (FTP).
"Yikes!" you say. "What else do I need to
know?"
What's a server?
- A server is simply a big hard drive that lots of users
can access. Your web site is saved in several places. If you
work on it at home, you probably save your site to your hard
drive. You may try to back it up on a floppy or two, but floppies
don't have the capacity to hold a website that contains lots
of images. So you may back up your web site on a Zip disk, too.
Most likely, however, your site is saved on the server in the
lab where you meet for a class. Everyone in the class can
save to this server, but no one (we hope) can access this server
from outside the site where that server is located.
- The internet is a vast collection of connected computers
called web servers. Those web servers can be accessed by anyone
who has permission to do so. You will upload your web site to
a web server, and by doing so, you will give permission to others
to access your material. Only you will have permission to change
your web site, but everyone will be able to see your stuff.
"Ok. That's pretty simple. There must be more," you
speculate.
Do I need to choose a server?
- You need to choose the server you want to use. However,
you are fortunate in that you attend CSUS. Colleges and Universities
usually provide free e-mail and web site hosting to their students.
CSUS is no different.
- The Saclink Option: The CSUS
account you can use is called Saclink, and you can get one of
these from University Computing and Communications Services on
campus in the Science building in room 322. You'll get instructions
that show you how to set up your account, and the friendly people
there will also walk you through any problems you may experience.
- Once you sign up, it takes 24 hours for the account to
be established.
- After your account has been established, you need to activate
your web site. That's one of the options you choose as you set
things up. It takes about twenty minutes to log on, read the
disclaimer and set up the site.
- You get a cup of coffee and read the class textbook assignment
for about thirty minutes, and your site is active.
- All your questions can be answered by clicking on this URL:
http://www.csus.edu/uccs/saclink/faq.htm
- The Cohort Server: Because you're part
of a CSUS cohort, you may use the Cohort server we have set up for you on
campus. More on that below.
- The ISP Option: The other
option, is to use a private provider. These are called ISPs (Internet
Service Providers). You pay for this service to get your Internet access
(e-mail and www access). My local ISP is called Oronet. When I upload
family webs, I use that option. Most ISPs will give subscribers free
web hosting up to a point. Oronet gives me 2 megabytes. After
that, I need to pay them to store my webs.
- Commercial web hosting: There are many
commercial sites that will host your sites. Geocities
or Xoom are two examples. I don't
recommend them for webs that are used with your students, because the
advertising selections are unpredictable.
- I would suggest that you use a combination of the first three
options. Having lots of server space is a big deal when you make
websites. It's like pie and ice cream; there's never enough!
"So, are you saying that I've already got server space
somewhere?" you ask.
"Yes, but to activate your Saclink account or your ISP web space,
you need to be proactive. Go to the University Computing and Communications Services
for a Saclink account and find out about it. As well, call your Internet
Service Provider (ISP) and let them know you want to use their server to store
a website. They'll tell you how much space they have allocated to their
users."

What software is necessary?
- There are several pieces of freeware and shareware that
you can use to upload your web site. Click on any of the options
named below to go to the download sites.
- The common software for the Macintosh is called "Fetch"
by Jim Matthews from Dartmouth College. It's free to those connected
with educational institutions and charitable organizations.
- Another very nice piece of FTP software for the Mac is
called "Transmit"
(also referred to as Transit) from Panic Software. You can download
it for free, and if you want to buy it, you pay only $24.95!
Transmit is much easier to use than Fetch in my opinion, but
both are extremely user friendly.
- The most common software for PCs is called "WS_ftp"
from Ipswitch Inc. and it's completely free.
- In this lesson, I'll illustrate using Fetch for Macs
and Ws_ftp for Windows users. Once you know how
to use Fetch, any other set-up will be similar.
Can this be done anywhere?
- Yes, unless there is a firewall that prohibits this procedure
from the lab you're using.
What gets uploaded?
- Everything in your web site folder gets uploaded to the web server you
choose. You will have a directory on the web server. With Saclink, it's called
"web". You will upload all your html files and all your gif and
jpg images.
Can I download files, too?
- Absolutely! Anything that can be placed on a web server
can be taken back or deleted. Remember, your files are still
on the hard drive in the lab and probably at home, too. When
you upload and download, files remain on the host computer. You
can think of this process as copying files from one location
to another.
So how do I use FTP?
- This is actually the easy part, but it can be dreaded by the uninitiated.
- Click here if you're in a Windows environment.
You won't need to see this Mac stuff.
- If you're using a Mac to upload to the Cohort server, you need to get
the specifics (Host Name) from the PC section of this tutorial.
This is the section for those of you who are using a Mac.
You will need to download Fetch. Most likely, however, it will be on the
computer you use in the lab. Open Fetch by double clicking on its icon. You
will see a window that looks similar to this.
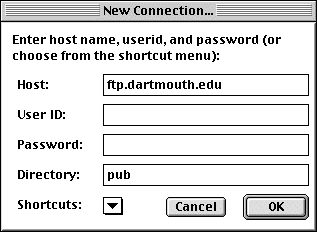
Hit "Cancel" and go to "Customize" =>
"New Shortcut" as you see in the image below.
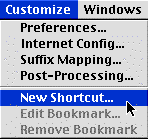
You will see a window similar to the one below.
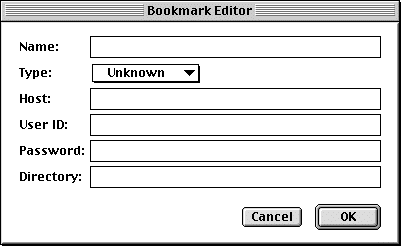
Enter the correct information to make the window similar
to this one if you're configuring Saclink.
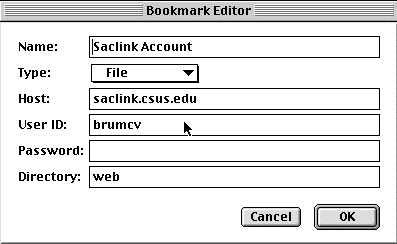
Obviously, your User ID will be different than mine. Don't
enter your password because this information is saved on the computer
you're using in the lab at the time.
Enter the correct information to make the window similar
to this one if you're configuring Classweb.
Once you click on OK, you have a shortcut that you can access
from that particular computer. If you use another computer, you'll
need to reconfigure another new shortcut. Since I do most of my
uploading at home, I usually forget the procedure. Lucky for me
I have it written down somewhere!
To actually upload something, all you really do is open
Fetch, cancel the window that opens up first, go to "File"
=> "Open Shortcut" and you'll see your account name
that you entered into the window above. You'll see lots of other
accounts, too. Just ignore them. You only need yours. When you
open your shortcut, you'll see the password window.
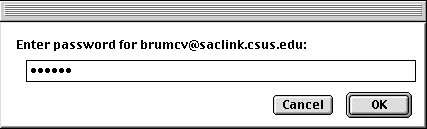
Your user name will be at the top (not mine) followed by
@saclink.csus.edu or @classweb.educ.csus.edu.
Enter your password and press return. A window opens with a little
dog that "fetches" your directory on the Saclink or
Classweb server. Here's the directory window
below with the fetch pooch scooting right along!
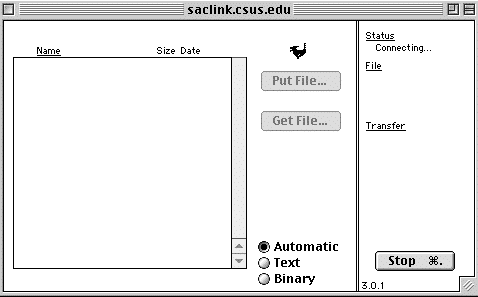
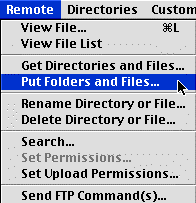
When the dog stops, you're in your directory. At this point,
you go to "Remote" => "Put Folders and Files"
in the Mac menu bar.
The last window that opens is the one that lets you select
the files you want to upload. It looks like this. When you're
finished adding to the list (double click on the files you want),
click Done! You can drag and drop from your file folders to the
directory window above, too.
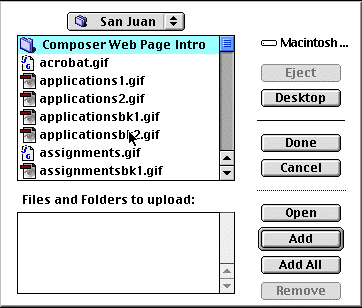
The Window above shows you a portion of my San Juan folder
on my hard drive. The files that I double click will appear in
the little window below that one and upload to one of the CSUS
faculty servers. You will upload hundreds of times! Typically,
when I make a web page, I edit, save, browse
and upload eight or nine times per page. It pays to get
to know this procedure as soon as possible.
On Windows machines, the WS_FTP set-up looks like this:
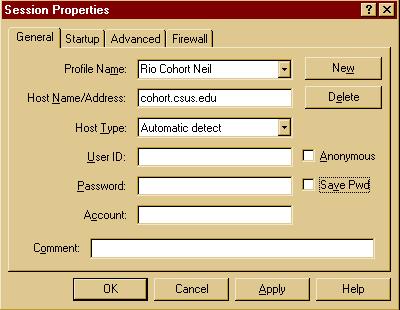
When you see this "Session Properties" window for the first time,
click on "New" and you'll be taken to a "Session Properties"
window with most of the text boxes empty.
- The Profile name can be anything you want. I've used Neil for this
example. You should enter something that identifies you as the user.
- Fill in the Host Name as shown above. Use cohort.csus.edu
as a host name.
- The Host Type can remain as "Automatic detect".
- Type in your User ID that was given to you in class.
- Type in your password but DON'T CLICK ON Save Pwd unless you are on your
own computer at home. Otherwise, anyone using the computer that you're using
for this procedure can open your account.
- Leave "Account" blank.
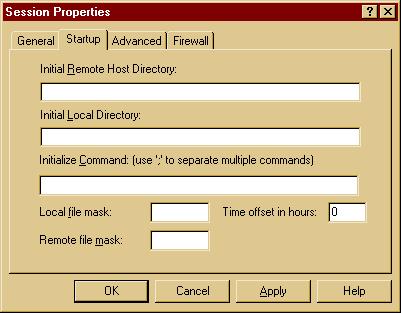
- IMPORTANT: At the top of the Session Properties
window is a tab named "Startup". Click on that tab and you'll see
the window below. In the text area below "Initial Remote Host Directory:"
type the directory path I give you in class for your initial remote host directory.
The Initial Local Directory can be left blank. You can enter the path to your
web if you want. For example, my "Initial Local Directory" path
is C:\My Documents\Web Sites. Leave everything
else blank. Hit OK.
After you hit OK, your new window looks like this.

The window on the left is your computer; the one on the
right is the remote server. You need to doubleclick the "riolinda1"
directory (sanjuan1 if you're in ETMA) on the remote server. That will open another window as you see
below.
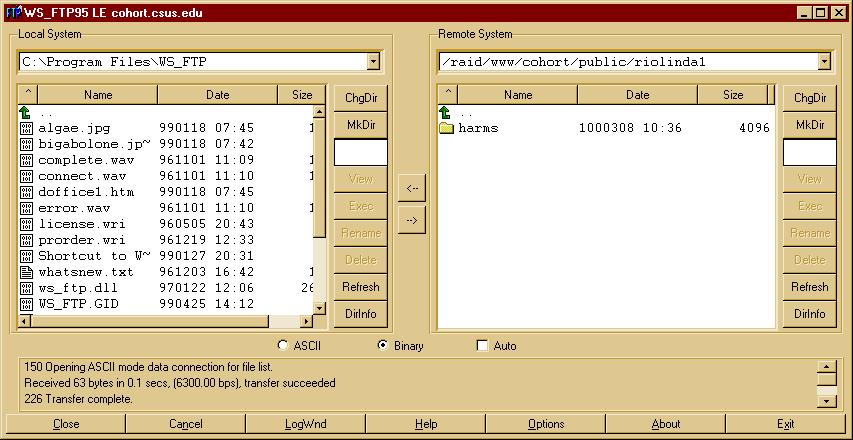
Once there, you will see that I have created a folder for Neil (Stu in
San Juan).
You will need to make your own folder when you get to this point. To do
this, look in the remote server side of the window above and locate the MkDir
button. When you click on that you will see the window below.
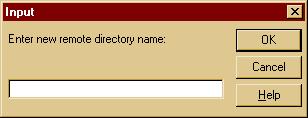
You need to enter your last name in lower case letters. Remember all
those rules for filenames? All lower case with no special
characters. Click OK and you'll return to the window which shows your
hard drive on the left and the server on the right. When you doubleclick
on your new folder, you'll see the server side of the window will be
blank. Notice that we're in Neil's folder, but there's nothing uploaded
to it yet.
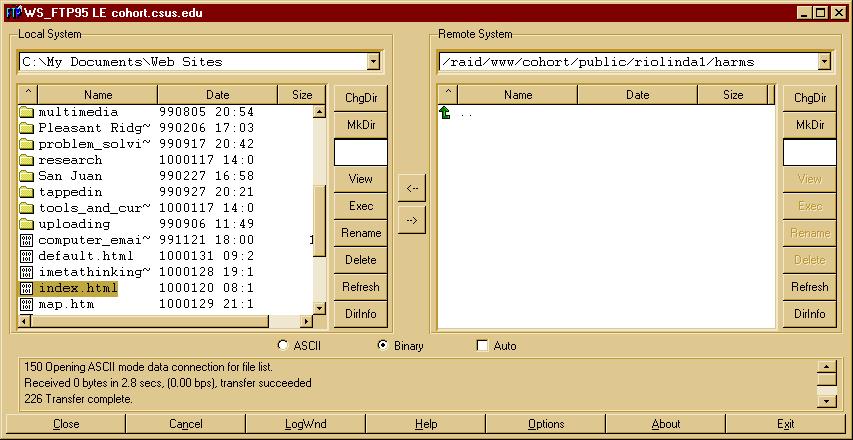
You must now use the left side of the window above and navigate to the
web you would like to upload. To change directories on either side of
the window, click on the little green arrow  .
So, click on the green arrow in left side of the window (your hard drive) to
locate the correct folder you need to upload. You can also upload a
single file.
.
So, click on the green arrow in left side of the window (your hard drive) to
locate the correct folder you need to upload. You can also upload a
single file.
Choose the files or folders in your
hard drive to upload to the server by selecting (painting) them. Once selected,
click on the arrow between the two windows that points to the right  . Doing the opposite
will download files from the server to your hard drive. Kapeesh? Hey, it's
not rocket science. When you're done, click on "Close" at the
bottom-left of the WS_ftp window.
. Doing the opposite
will download files from the server to your hard drive. Kapeesh? Hey, it's
not rocket science. When you're done, click on "Close" at the
bottom-left of the WS_ftp window.
And finally, your URL will be something
like the URL below except with your name for the final folder. If you used
an index.htm as your first page (and you should), then that will be your
default whenever someone enters your URL.
http://cohort.csus.edu/riolinda1/harms/
or
http://cohort.csus.edu/sanjuan1/freedman/
You can send your URL to anyone in the world who is online,
and they can see what you've done. You can even e-mail it to yourself
if you think you'll forget it!
For advanced web designers: Frames