
extreme wide shot

wide shot

medium wide shot

medium shot

Medium Close-Up
Close-up

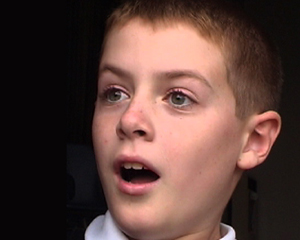
extreme close-up shot
Elements
of Cinematography
Camera:
In film making multiple cameras (multiple camera positions of a single camera)
are often used. In editing phase scenes/shots are assembled in a way that the
story is told in an effective way. In computer animation, a considerable amount
of time is spent on pre-planning (e.g., storyboarding and animatics) so that
a maximum amount of fully rendered scenes an/shots will be used for the final
animation.
The topics in this handout are:
Types of shots: The followings are types of shots commonly used in film, video, and animation.
1. Shots with different shot sizes. One of the major distinctions among types of shots is the shot size. The shot size identifies how large and area will be visible within the frame. Among the following common shot sizes the distance between the camera and subject varies.
extreme wide shot |
wide shot |
medium wide shot |
medium shot |
Medium Close-Up |
|
extreme close-up shot |
|
The images
are from "The Art of Technique: An Aesthetic Approach to Film and Video
Production"
by John Douglass and Glenn Harnden
Notes: Indecisive
cut and shock cut
When cutting from
a shot to another shot of a different shot size (e.g, from a wide shot to a
medium wide shot) while framing the same subject, the difference in image size
must be decisive. If the size of the subject does not change sufficiently, you
will get the unpleasant effect of an indecisive cut and the audience will perceive
it as a mistake or a distraction.
On the other hand, when cutting from a shot to
another shot of a significantly different shot size (e.g, from a wide shot to
a close-up shot), you will produce a shock effect which is most likely inappropriate.
The usual compromise is to have a shot of a shot size that is inbetween the
sizes of the two shots (e.g., from a wide shot to a medium shot, and then to
a close-up shot).
2. Shots with different camera angles. Another one of the major
distinctions among types of shots is the camera angle. Changing the camera angle
changes the appearance and function of your shot.
Vertical camera angles. Moving the camera around the subject vertically
while aiming at the subject creats different camera angles below:
 high angle |
|
The images
are from "The Art of Technique: An Aesthetic Approach to Film and Video
Production"
by John Douglass and Glenn Harnden
Note: Indecisive
cut
When cutting from a shot to another shot with a different camera angle (e.g, from a frontal shot to a three quarter front), framing the same subject, the difference between the two camera angles must be greater than 35 degrees. If the difference is less than 35 degrees, and the appearance of the subject does not change sufficiently, you will get the unpleasant effect of an indecisive cut and the audience will perceive it as a mistake or a distraction.
3. POV shots. In a point of view (POV) shot, the camera is placed at the eye position of a character. (Birn, 8.2.4 POV Shots, pages 180-1)
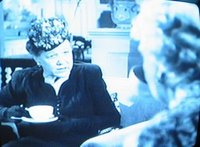
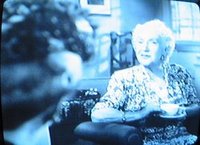
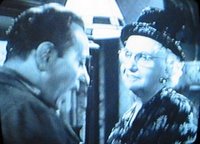
4. Two shot & over-the-shoulder shot
 Two shot |
 Over the shoulder shot |
180
degree rule
If you are using multiple cameras and plan to edit the different shots in a
scene into a seamless sequence, an important rule to keep in mind is to place
all the cameras on the same side of a line of action. A line of action
is a path which your subject is traveling along or an imaginary line between
two characters who are interacting. This rule is called "180 degree rule".
Look at the following camera placements:
If Camera 2 and Camera 3 are used, the audience stays on one side of the line of action. These shots are called "reverse angle shots". 180 Degree Rule Video |
|
 |
 |
If Camera's 3 or 4 are used subjects will appear on opposite sides of the shot which can be disorienting |
|
 |
 |
Camera
moves
The camera position is often animated in computer animation for no good reason
or no reason at all simply because the virtual camera can be moved easily. If
you want to animate realistic and effective camera moves, study popular types
of possible camera moves with a real camera. Try the following:
Dolly vs.
Zoom
The difference between dolly and zoom is that when you dolly, you
are moving the camera in space, while zoom refers to changing the camera's
focal length. When you move the camera, the perspective changes. Objects far
from the camera change in relative size at a slower rate than objects which
are close to the camera. That is what you see through your human eyes as you
walk around, your perspective changes. On the other hand, when you zoom (i.e.,
when you change the focal length of your camera), your camera does not move
and perspective does not change.

Composition
Rules: The
followings are useful
guidlines you can use when composing a shot.
1. Rule of thirds
Rule of thirds divides the frame into thirds both horizontally and vertically.
The points where the vertical and horizontal lines cross are aesthetically
pleasing spots to place subjects or to have perspective lines converge. It
is usually best to avoid placing horizon lines exactly in the middle of a
frame, but to place the horizon either above or below center, approximately
one-third or two-thirds up the height of the frame.
 |
 |
The images are from
"Digital Lighting and Rendering" by Jeremy Birn and "The
Art of Technique"
2.
Teeter-totter rule
Lighter weight can counterbalance a heavier weight if it is placed
farther away from the center of the frame.
3.
Avoid frontal angle
The frontal angle tends to flatten the three dimensionality of facial features and environments.
Angling the shot produces more depth and volumes.
 |
 |
|
| Shooting straight against walls produces flat compositions with little sense of depth in frame. | Angling the shot into walls produces receding perspectives and a better sense of depth. | |
Safe
Areas
Text, e.g., the title of your animation, should be kept in the center 80%
of the screen, within a guideline called the title safe area.
To make sure that your audience will not miss any important action in your
animation, the vital parts of your scene should take place within the central
90% of your frame, a guideline called the action safe area.
Why? It's because what's outside the action safe area is invisible on most
TV sets. (Birn's Page 190.)
