Intro
The objective of this assignment is for you to create a personal Web page. You may want to
refer to the following resources in completing this assignment:
- Your lecture notes on HTML tags and the handouts from the Monday,
November 30th lecture:
Using Computers: Essential Concepts - HTML source
Using Computers: Essential Concepts - Web browser display
HTML and Web Resources
Examples of student Web pages:
Joe Mattson -
Harvard University
Min Park -
Harvard University
Michael V. Ziniti
- Harvard UniversityJennifer Walsh - Tulane University
Steven Hardie -
Tulane University
James
Francis - University of Texas at Austin
Jodi
Jenkins - University of Texas at Austin
Jason Rall
- University of Texas at Austin
Jeff
Saurenmann - University of Texas at Austin
Step 1 - Activate Your Personal Web Page
- Login to your SacLink account.
- Select the Modify Account Settings menu item.
- Select Personal Web Page option.
- Read the Web policy and proper use guidelines.
Agree to the guidelines.
A Web directory structure will be created in your SacLink account. A template including
the mandatory CSUS personal Web page
disclaimer will be loaded into the directory. A link to your Web page will be added to
the CSUS
Directory of Personal Web pages.
Step 2 - View Your Web Page
- Open the Web browser of your choice (e.g. Netscape Navigator, or
Microsoft Internet Explorer)
In the Location box, type the URL: http://webpages.csus.edu/~sacXXXXX
(where XXXXX is your SacLink number) and press ENTER.
or
- Go to the CSUS home page at http://www.csus.edu.
- Click the CSUS Directory link.
- Click the Personal Web Pages link.
- Click the first letter of your last name to see your page.
Note: When you created your personal Web page on SacLink, an HTML document called index.htm
was created. This file is placed in a folder called web in your SacLink account
directory.
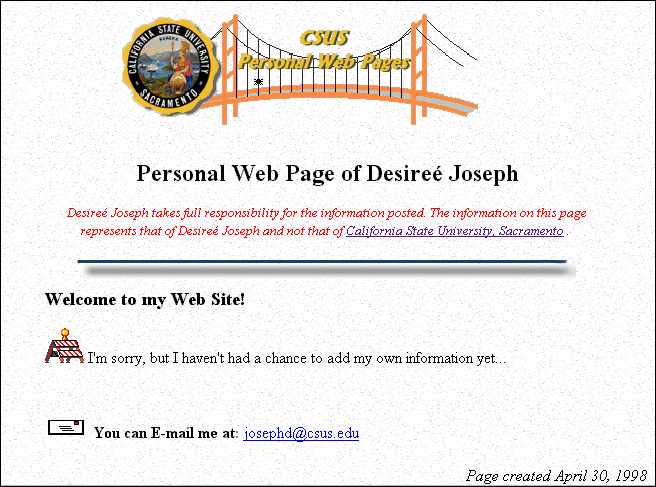
You Web page should look similar to the one shown below:
Step 3 - Open Your Web Page in PICO
Normally, you would download a copy of your Web page to a floppy disk and work on it
"offline" using a text editor or word processing software, and then transfer it
back to the Web. But, since it's the end of the semester (and I'm sure you want to get
this assignment over with), you will edit your Web page online. To do this:
- Log into your SacLink account.
- Select the File Utilities menu item.
- Select the Edit a file using PICO option.
Note: PICO is the same editor that you use to create an e-mail message in the PINE e-mail
program, so you should already be familiar with it.
- When prompted for a file to edit, type ./web/index.htm
The HTML source for your Web page will be brought into the PICO editor and is should look
similar to the HTML shown below:
<HTML>

                <HEAD>

                  <TITLE>Personal Web page of Your Name</TITLE>

                </HEAD>


                <BODY BACKGROUND="/graphics/sandston.gif"
              BGCOLOR="#FFFFFF">

                <BASEFONT = "3">

                <P>

                <CENTER>

                <TABLE WIDTH="90%">

                  <TR>

                    <TD ALIGN="center">

                    <IMG SRC="/graphics/weblogo.gif" BORDER=0
              USEMAP=#links WIDTH=411 HEIGHT=124 ALT="CSUS Personal Web Pages">

                    <H2>Personal Web Page of Your Name</H2>

                    <P>


                    <!-- The following disclaimer is REQUIRED to be on
              personal Web pages -->

                    <I><FONT SIZE="-1"
              COLOR="red">Your Name takes full responsibility

                    for the information posted. The information on this page
              represents

                    that of Your Name and not that of

                    <A HREF="http://www.csus.edu">California
              State University, Sacramento</A>

                    .</FONT></I>


                    <!-- End of disclaimer -->

                    <P>


                    <IMG src="/graphics/blue_bar.gif">

                    </TD>

                    </TR>

                    <A NAME="top">

                    <TR>

                    <TD VALIGN="top">

                      <H3>Welcome to my Web Site!</H3>

                      <IMG align="Bottom"
              src="/graphics/barrier.gif">

                      I'm sorry, but I haven't had a chance to add my
              own information yet...

                        <P>

                      <IMG align="Bottom"
              src="/graphics/letter1.gif">

                      <B>You can E-mail me at:</B>

                      <A HREF="mailto:sacXXXXX@saclink.csus.edu">saxXXXXX@saclink.csus.edu</A>

                    </TD>

                    </TR>

                </TABLE>

                </CENTER>

                <P ALIGN="right"><I>Page created April 30,
              1998</I></P>


                </BODY>

              </HTML>
|
Step 4 - Edit Your Web Page
After the following code <H3>Welcome to my Web
Site!</H3>:
- Type a welcome message or an introductory paragraph about yourself.
Create a link to the CSC001 Course Web page.
Create a list of links to your five (5) favorite Web sites.
Step 5 - Insert a Picture --- optional
---
To obtain a picture from the Web and insert it on your Web
page, complete the following steps:
- Open the Web browser of your choice, if it's not already open.
Visit one of the following sites (or one of your own
choosing) that contains FREE graphic images...
- www.freegraphics.com
- www.designheaven.com/GraphicsRing/
- scc.pinehurst.net/graphics.html
- www.altwebmasters.com/aag/
- www.online.ee/~aaleo/anim/
- Home.InfoRamp.Net/~dredge/
- www.el.com/elinks/webgraphics
Save the Web image to floppy disk:
- Find a picture.
- Move your mouse pointer over the picture.
- Press the right mouse button and a short cut menu appears.
- Choose the Save Image As command.
- In the Save As dialog box, change the location to your floppy disk and note the
name of the file: __________________________ .
- Wait for the file to be copied to your floppy disk.
- Transfer the image from floppy disk to the Web:
- Run the WS_FTP program (located under IP Applications) and the Session
Profile dialog box appears. An example of the WS_FTP Session Profile dialog box
is shown below.
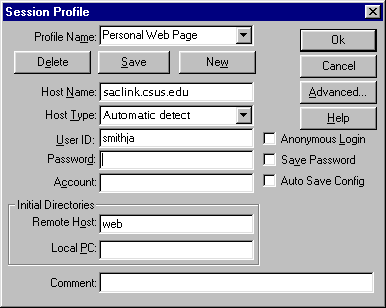
- In the Profile Name box, type Personal Web Page).
- In the Host Name box, type saclink.csus.edu.
- In the User ID box, type your SacLink user name.
- Skip over the Password box.
- In the Remote Host box, type web.
- In the Local PC box, type A:.
- Click the Save button to save the session profile so that next time you do not
have to type this information. To start future transfer sessions, you will click on the Proflie
Name down arrow and choose your profile name.
Please note that for security reasons, you skipped over the Password box so that
you would not save it with the session information. If you had saved it, anyone using the
computer could start WS_FTP and again full access to your Web page files.
- Click OK.
The Password dialog appears.
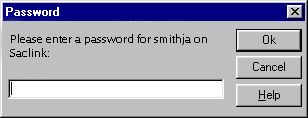
- Type in your password and click OK. The WS_FTP main window appears. Your
login will automatically place you in your Web directory. At this point you can view the
contents of your directory under the Remote System section (right side of dialog
box). The Local System section (left side) shows where your Web files are stored on
your PC.
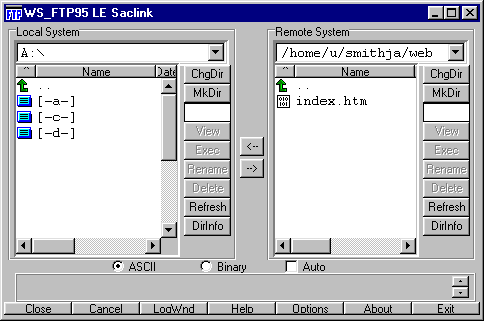
- In the Local System section, select (single click) the image file you just saved
to the floppy.
When transferring graphic files (.gif, .jpg, or .jpeg) make sure that Binary is
selected as the transfer mode.
- After selecting the image file, click the Transfer button
 to transfer
the file to the Web server. to transfer
the file to the Web server.
Your image file has been transferred to the Web Server.
- Click the Exit button to exit from WS_FTP.
Files transferred to your Web directory must have the appropriate file permissions set so
that users can access your Web page and images. There are several ways to do this, however
we are going to use the simplest method. (Also note: anytime
modifications are made to your Web page you must re-set the file permissions.)
To set file permissions:
- Log on to your SacLink account.
- Select the Modify Account Settings menu item.
- Select Personal Web Page option and the following message appears...
You are currently authenticated for personal web pages.
Now verifying proper directory setup...
Home directory: ok
web/: ok
web/index.htm: ok
index file: entry will be updated
- To insert your image:
- Make sure that you are logged in to your SacLink account.
- Refer to Step 3 (above) to open your Web page in PICO.
- Locate and delete the following code:
<IMG SRC="/graphics/weblogo.gif" BORDER=0 USEMAP=#links WIDTH=411
HEIGHT=124 ALT="CSUS Personal Web Pages">
- Use the <IMG SRC="xxxxx"> tag to insert your image (where
"xxxxx" is the name of your image file).
- Save the file.
- Exit from PICO.
- Make sure that you have reset the file
permissions (see above).
- Exit from SacLink.
Step 6 - Test Your Web Page
- Open your Web browser if it's not already open.
- Go to your Web page.
- Test the links to make sure they are working.
- Check whether your graphic image shows up (if you did Step 5).
A Few Last Words
- Be creative!
- Personalize your Web pages as much as you like.
- When you are finished, send me an e-mail message at josephd@csus.edu telling me the URL of your Web page.
Good Luck!
|