
Jump to the Dreamweaver version.
Many web designers will use a table to organize information around a topic with many subtopics. Tables can look similar to database lists or spreadsheets without the sorting and calculating functions. The table below is a good example of this use. This is a table that served as part of an example of a database on Marine Phyla.
|
Animal |
Phylum |
Locomotion |
Feeding |
Defense |
Reproduction |
Unique Characteristics |
| Nudibranch | Mollusc Gastropod | Poda | Radula, active feeder | Nematocysts, coloring | Sexual | Swallows anemones for their nematocysts, shelless |
| Purple Sea Star | Echinoderm | Tube feet | Tube feet, oral disk, active feeder, oral disk | Spiny skin | Sexual, regeneration of parts | Regurgitation of stomach to digest food |
Tables, however, have a much more creative side. In fact, it's a hidden side that makes webpage design much more fascinating. Take a moment to experience a virtual tour of an intermediate school in my district, and you'll see what I mean.
The images in the virtual tour are nested within a table with several rows and two columns. But, there's more. In any web authoring application, the creator of the table can also make its borders invisible. This simple idea allows us to place images almost anywhere on a web page. Tour the Alta Sierra Elementary School and notice the table borders are invisible. Pretty dang slick, don't you think? So, how is this done? It's very simple. You can even place tables within other tables. This is called nesting.
Open a new or existing page in FrontPage. Place the cursor on a fresh line, and center it if you like. Go to Table => Insert => Table in the menu. In the window that pops up, select the number of columns and rows you want, and select the border size. Zero means no border. You may also use the icon on the FrontPage tool bar and select the rows and columns you want by simply dragging. You know the routine by now. It's getting more and more intuitive as we go along.
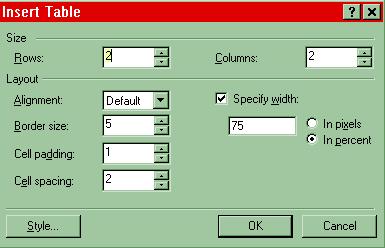
The table below is a 3 by 3 invisible table. To give you a frame of reference (no pun intended), I inserted a table with a border in the middle cell and placed the "Insert Table" window inside it. I made the outer table (the invisible one) 85% of the screen size by clicking on "In percent" radio button in the "Insert Table" window. I entered 85 to indicate that I want this table to be 85% (not the 75% default) of any screen on which it appears. I also added the link to the top of the page and a link to "Home" just so you realize that tables can have links in them. Pretty powerful stuff!
|
|
Below is a table within a table. |
||
|
|
|||
|
|
You can edit tables, too. You change the size of table or a row or column by moving the cursor slowly over the bottom, left or right border of the cell, row or column. Click and drag when you see the double arrow appear over the border. To select a row or column, move the cursor slowly to the top or left border. When you see the single arrow, just click. You will notice that the row or column is selected and the toolbar at the bottom of your screen changes slightly to reveal some formatting options. If you don't see the toolbar, go to "View" in the menu bar and select "Table Toolbar". You can also go to Table => Select in the menu bar and choose Table, Column, Row or Cell.
![]()
These options allow you to justify your row or column vertically, split cells, delete and even fill a row or column with another background color.
To select an individual cell from a table, simply click inside the cell, or you can also select the text or image in the cell. Once selected, a row, column or cell (or the whole table) may have the options you choose from the toolbar applied to them.
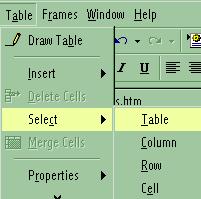
By the way, selecting all or part of a table may be done from the Menu Bar, too. Place your cursor inside the row, column or cell you want to select. Go to Table => Select => (Table, Column, Row or Cell) as you see in the image below.
Use tables to your advantage in creating web pages that have visual appeal. For an excellent overview of design principles in screen design, read The Non-Designer's Web Book, Chapter 6, pages 104 - 124.
![]()