
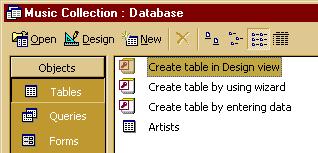
You have come a long way. Now we're going to make a table that keeps track of the recordings in your collection. In the "Database Window", Choose "Create table in Design view" again. Hit "New" and follow the steps we did in the first lesson.
Below are the names of the fields you will need.
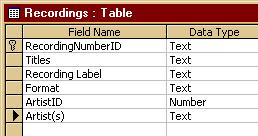
You'll notice that the RecordingNumberID is the Primary Key. Just as we did in the Artist Table, you can establish the Primary Key last. Essentially, the RecordingNumberID is what I use to make each record unique. I recommend that you use the Access "Auto Number" feature as we did last time we established a Primary Key. If you're really serious about your music, you can use the Recording number issued on the CD or recording cover or case. If you choose the latter, your "Data Type" will be "Text" as you see in the example above, rather than "Auto Number", but it will still need to be your Primary Key as it is unique.
Enter "Titles" in the "Field Name" column, hit Enter or Tab, and leave the "Data Type" as Text.
Do the same for "Recording Label".
Let's use the Lookup Wizard for "Format" so we can make a list of values to select. The values I have are CD, Eight-Track, Vinyl, Reel-to-Reel, Cassette, and Digital Media.
If you're not sure how to use the Lookup Wizard, go back to the last lesson.
For the ArtistID, choose "Number" for your "Data Type". While "ArtistID" won't be the Primary Key in this table, that's the field that will be linked to the Primary Key in the Artist Table. Notice the two fields have the same name, yet they are in different tables. In Access, we establish relationships by identifying matching fields in two or more tables.
Finally, for the "Artist(s)" field, just use Text as your "Data Type". You can create a value list with the Lookup Wizard as you have done before, but you would need to modify the list when you add a new artist to your collection after you get paid next month. Better to enter the artists as text.
By now, you've realized that no one can tell you everything there is to know about Access. Experimenting with Access truly expands your Zoped (Zone of Proximal Development). Fool around with it. I also recommend getting several books on Access. Probably the best I've seen for beginners is Teach Yourself Access 97 Visually by IDG books. Most quality brick-and-mortar bookstores will sell books on Access 97 and 2000 in their computer section. Running Microsoft Access 97 is the one I use for the tough questions.
Save your table as Recordings Table.
To establish the Primary Key for the Recordings Table, make a new Field Name called RecordingNumberID as I have done. Press Enter or Tab and choose "Auto Number" as your "Data Type. Hit the little key icon in the toolbar or select "Edit => Primary Key", and you've got a Primary Key for this table. Save your table.
Let's add some records to our new Recordings Table. Click on "View => Datasheet View" and you'll switch to "Datasheet View" where you may enter your records. Enter a few records and save your table. You must enter the correct ArtistID in the Recordings Table. If you don't, you will have problems creating a relationshipe between your two tables.
By the way, there are icons in the toolbar that allow you to switch views. More Zoped.
Now, we're ready to establish a relationship between the two tables.
Save and close all your tables and make sure the Database Window is open.
Click on
the little relationships icon ![]() in the toolbar or go to "Tools => Relationships..." in the menu
bar. A large, blank window opens. Now you will see another little
icon
in the toolbar or go to "Tools => Relationships..." in the menu
bar. A large, blank window opens. Now you will see another little
icon ![]() in the toolbar.
You can click that icon or go to "Relationships => Show Tables..."
to select the tables you want to place in the Relationships window. Below
is what you will see.
in the toolbar.
You can click that icon or go to "Relationships => Show Tables..."
to select the tables you want to place in the Relationships window. Below
is what you will see.
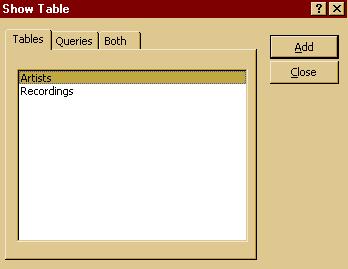
Choose each table by selecting and clicking on the "Add" button once for each table.
The last step is to create the relationship between the Primary Key in the Artists Table and the matching field in the Recordings Table. You will see this screen below once you've added tables to the Relationship window.
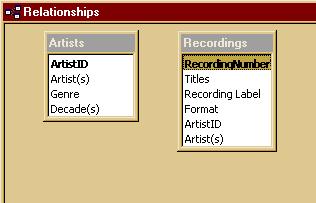
Click and drag the ArtistID field in the Artists Table to the matching field (ArtistID) in the Recordings Table. You just drop the one field on top of the other. Access essentially does the rest.
Below is the new window you will see.
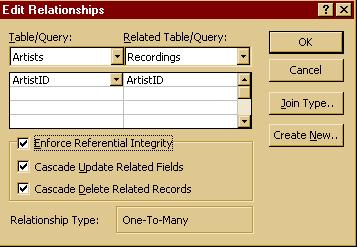
Click on the option that allows you to "Enforce Referential Integrity" as well as the two boxes below that one.
You now have a One-to-Many relationship between your two tables.
Click OK and you're done. Make sure you save your work. Below is what you will see.

Relationships in Access can get messy and confusing! (Not like in real life, eh?) For an explanation of the Primary Key concept along with examples and illustrations, see the website "Access to Relationships" in this series of tutorials.
Now, you can enter records into either of your Tables. The next lesson will show you how to make a form for easier data entry. For now, you've earned a break.
Go on to Creating a Form.