Support Page Content
Advanced Class Scheduling Manual
About Advanced Scheduling
Intro Paragraph About What This Is
Additional Sections
Special Sessions / Irregular Meeting Patterns
Classes with non-standard meeting dates are defined as Special Sessions. These are generally 5 or 8 week classes, but there are others. After you have followed the instructions in the Basic Scheduling Manual to set up your class, follow the instructions below to accommodate a special session.
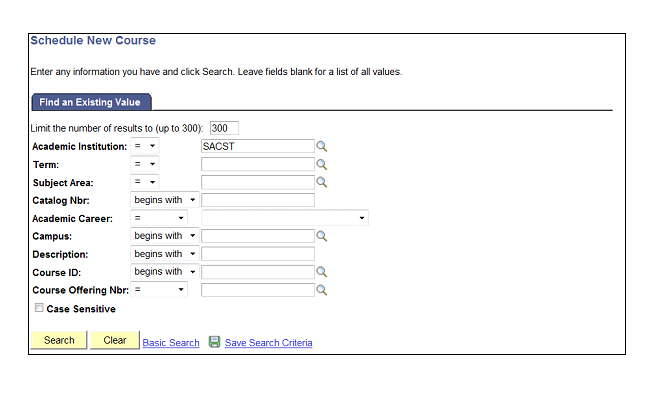
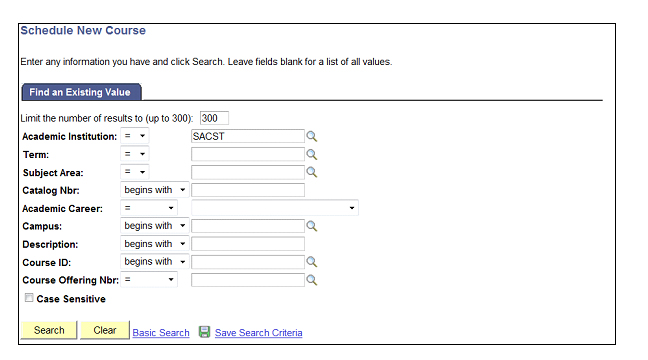
Navigation: Curriculum Management > Schedule of Classes > Schedule a New Course (Figure 1: Search page.)
- Enter "SACST" for the Academic Institution.
- Fill in the Term code. If necessary, use the magnifying glass to look up the term value.
- Enter the Subject Area.
- Type in the Catalog Nbr.
- Click the Search button.
Note: You may have to select from a list of search results at the bottom of the screen depending on the criteria you entered.
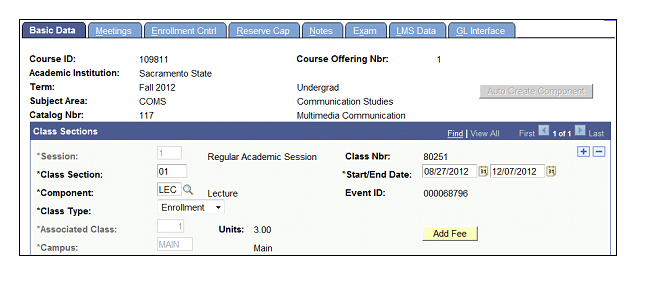
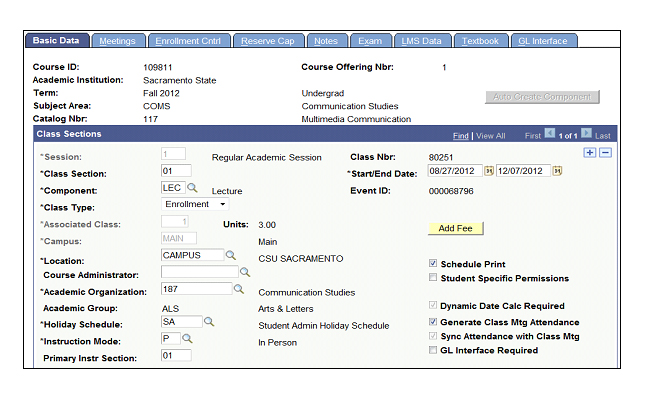
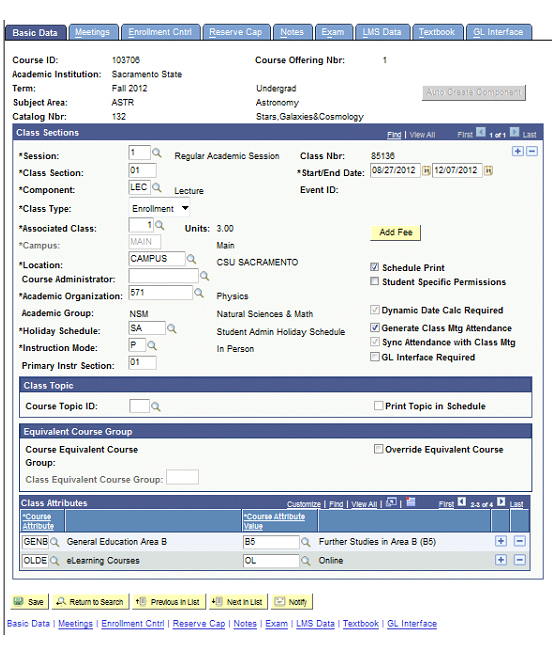
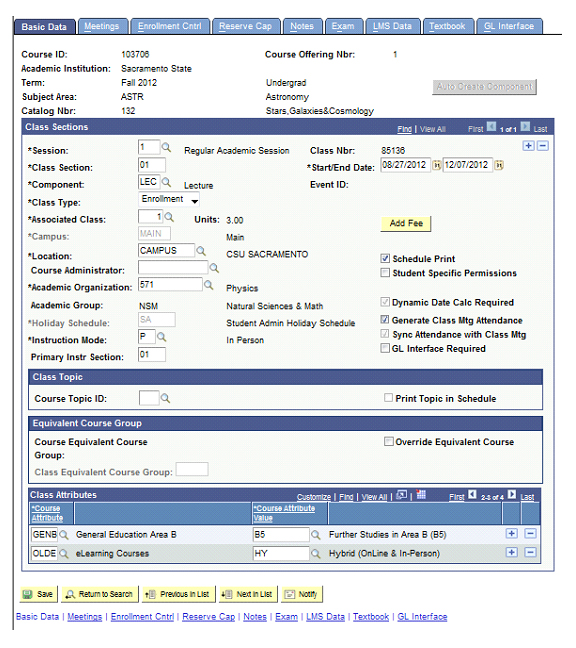
- Note the Start/End Date on the Basic Data tab. This date represents the beginning and end dates for the session. (Figure 2: Basic Data tab.)
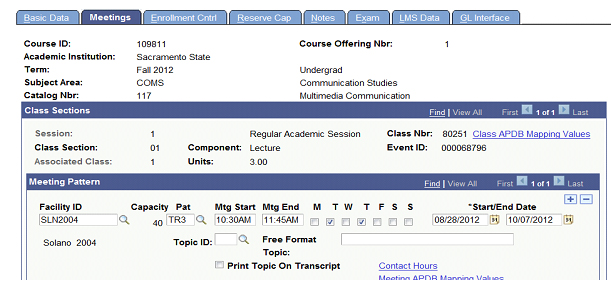
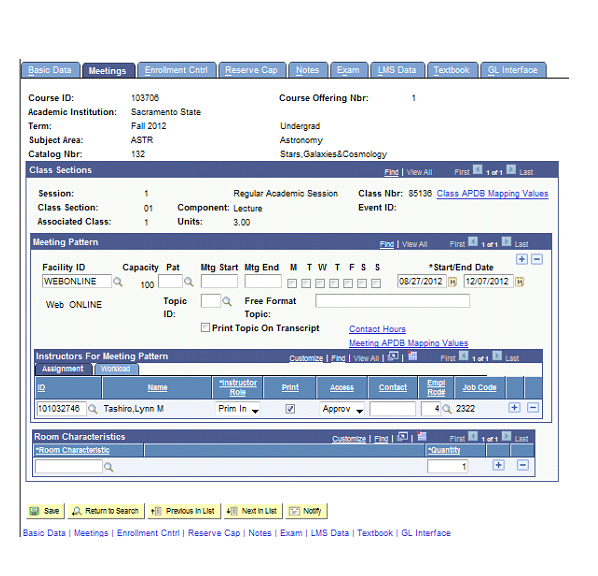
- Click the Meetings tab.
Non-Standard Meeting Dates
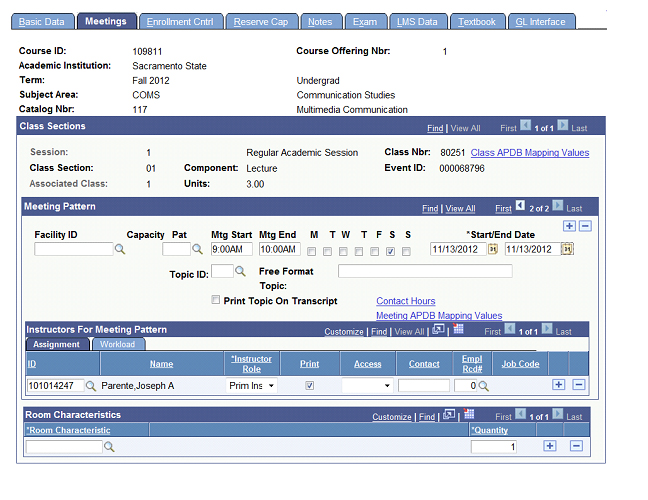
If you have a class that meets during a date range that does not match the standard session dates on the Basic Data tab (e.g., 5 or 8-week sessions), you will need to adjust the Start/End Date on both the Basic Data tab and the Meetings tab. (Figure 3: Meetings tab.)
- The Start/End Date information will default to the session dates. Adjust the Start and End Dates on your meeting pattern as necessary.
Examples: For a 5-week session you might enter 9/5/12 – 10/5/12and for an 8-week session you might enter 9/5/12 – 10/26/12.
- You can use the Calendar icons next to the Start/End Date fields to select the desired dates.
Note: The Start Date should be the date of the first class meeting. The End Date should be the date of the last class meeting.
- Go back to the Basic Data tab and adjust the Start Date and End Date just as you did on the Meetings tab.
If the dates for your class fall outside of the standard session dates on the Basic Data tab (i.e., your class ends late or starts before the regular semester), you will need to adjust the dates on the Basic Data tab before changing them on the Meetings tab.
- Click the Save button.
Irregular Meeting Patterns
If you have a class with multiple times and/or date ranges for its meetings, you will need to create multiple meeting patterns.
- Enter the first time, day and date range for your class meetings. (Figure 4: Meetings tab.)
Example: A class meets at the same time on Monday & Wednesday for the entire semester and then on three individual Saturdays. The first meeting pattern should include the MW meeting and time with dates for the entire semester.
- Click the plus (+) button in the Meeting Pattern section to add another meeting pattern. (Figure 5: Meetings tab.)
- Enter the second time, day and date range for your class meetings.
Note: For meetings patterns that include just one individual day, the date of the class meeting should be entered for both the Start and End Dates.
Example: For the example mentioned previously, additional meeting patterns should be inserted for each of the Saturday meeting dates and times.
- Notice that you are now viewing row "2 of 2" in the Meeting Pattern section. You can click the "View All" link and scroll down the page to review each meeting pattern you have entered.
- If an instructor appears on multiple meeting patterns for a class, by default the value of the class will be multiplied when their workload is calculated. You can avoid this by clicking the Workload tab and changing the Assign Type value from "IFF" to "Not Include" for any meeting patterns beyond the first one.
- Add additional meetings patterns as necessary.
- The dates on the Basic Data tab need to reflect the entire range of dates for the class. If your class is not a 16-week course that meets during the regular semester dates, click the Basic Data tab and change the Start/End Date values to the date of the first and last class meeting.
- Click the Save button when you've completed the process.
Graduate Weighted Units
Variable Credit Courses (Graduate Level)
Effective Fall 2009, variable credit courses at the graduate level will be scheduled the same way undergraduate variable credit courses are scheduled. Departments will no longer need to setup an individual section for each unit value. When searching for an independent study, thesis, or internship course through “Schedule New Course”, only one version of the graduate level variable unit course will display.
Navigation: Curriculum Management > Schedule of Classes > Schedule New Course (Figure 6: Search page.)
- Enter "SACST" for the Academic Institution.
- Fill in the Term code. If necessary, use the magnifying glass to look up the term value.
- Enter the Subject Area.
- Type in the Catalog Nbr.
- Click the Search button.
Class Associations / Groupings
Process Overview
For enrollment purposes, the Associated Class Number is used to link all class sections that constitute a single course offering. For example, if you are scheduling one lecture component with multiple lab sections from which a student can choose, all lab sections of the course offering need to have the same Associated Class Number as the lecture component.
These associations/groupings need to be adjusted to dictate which sections must be taken together and, to complete the process, enrollment controls need to be set. If a student has multiple options as to the lab they can take with a lecture, the labs will have a Class Type of "Enrollment" and the lecture will have a Class Type of "Non-Enroll". The Auto Enroll feature can then be set so that the student selects a lab section and the system automatically enrolls them into the only lecture available for that lab.
Highlighted in the following visuals are the key fields for setting up Class Associations. (Figure 7: Basic Data tab, Figure 8: Enrollment Cntrl tab.)
Navigation: Curriculum Management > Schedule of Classes > Schedule New Course or Maintain Schedule of Classes
Single Component Class Example
For a basic class that has only one component (e.g., Lecture or Discussion), set your class up according to the instructions below.
Navigation: Curriculum Management > Schedule of Classes > Update Sections of a Class
- Build your sections and assign Class Section numbers consecutively (i.e., 01, 02 then 03).
- The Component field will default.
- The Class Type value will default as "Enrollment". Leave this default value on all sections.
- Enter an Associated Class number for each section that matches the Class Section number you assigned. (The Associated Class number cannot have a leading zero.)
- Click the plus (+) button on the Basic Data tab after entering each section to begin creating a new section.
- Click the Save button.
Once you have finished scheduling your sections, it may be helpful to look up the class via the Update Sections of a Class page to review the information. Your class should look something like the example shown in the following visual. (Figure 9: Single Component Class.)

Single Discussion & Lab Example
For a class with a single discussion and lab that must be taken together, set your class up according to the instructions below.
Navigation: Curriculum Management > Schedule of Classes > Update Sections of a Class
- Build your discussion class first and assign a Class Section number of "01".
- Make sure that the Component value is "Discussion".
- The Class Type value will default as "Enrollment". Leave this default value on the discussion (Section 01).
- The Associated Class number will default to "1". Leave the default value for the discussion.
- Click the plus (+) button to add your next section.
- Now build your lab class and assign a Class Section number of "02".
- Change the Component value to "Laboratory". Click the magnifying glass to look up the code, if necessary.
- Change the Class Type from "Enrollment" to "Non-Enroll".
- The Associated Class number will default to "1". Leave this default value alone so that it will match the number on the discussion section.
- Locate the arrows at the top of the Class Sections box. Click the back arrow to go to section 01.
- Click the Enrollment Cntrl tab.
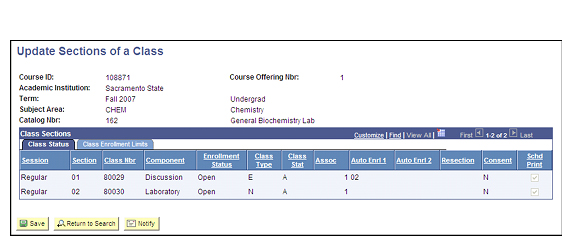
- Enter "02" in the 1st Auto Enroll Section field. Now students who enroll in the discussion portion of this class will automatically be enrolled in the lab section.
- Click the Save button at the bottom of the page.
Once you have finished scheduling your sections, it may be helpful to look up the class via the Update Sections of a Class page to review the information. Your class should look something like the example shown in the following visual. (Figure 10: Single Discussion and Single Lab.)
Single Discussion & Multiple Lab Example
For a class with a single discussion and multiple labs for students to choose from, set your class up according to the instructions below.
Navigation: Curriculum Management > Schedule of Classes > Update Sections of a Class
- Build your discussion class and assign a Class Section number of "01".
- Make sure that the Component value is "Discussion".
- The Class Type value will default as "Enrollment". Change this value to "Non-Enroll".
- The Associated Class number will default to "1". Leave the default value for the discussion.
- Click the plus (+) button to add your next section.
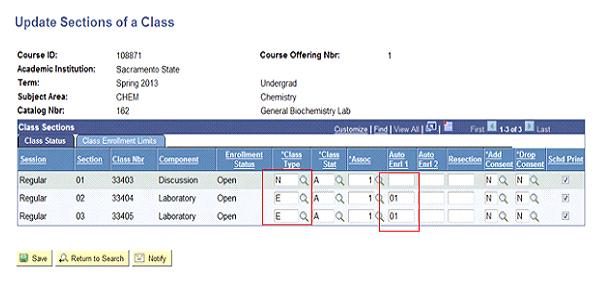
Now build your lab classes by following the instructions below.
- Assign consecutive Class Section numbers to your labs beginning with "02".
- Change the Component value to "Laboratory". Click the magnifying glass to look up the code, if necessary.
- The Class Type will default to "Enrollment". Leave this default value for all lab sections.
- The Associated Class number will default to "1". Leave this default value alone so that it will match the number on the discussion section.
- Click the Enrollment Cntrl tab.
- Enter "01" in the 1st Auto Enroll Section field. Now students enrolling in the lab section of this class will automatically be enrolled in the discussion section.
- Return to the Basic Data tab and click the plus (+) button to add any additional lab sections.
- Click the Save button when you have finished entering all necessary lab sections.
Once you have finished scheduling your sections, it may be helpful to look up the class via the Update Sections of a Class page to review the information. Your class should look something like the example shown in the following visual.
If you have additional discussion/lab groupings for a single class, you can repeat the process above. Start with the next available Class Section number and assign the next available Associated Class number. For example, if you built one group of classes and left off at Section 04, begin with Section 05 and use Associated Class Number 2. Also note that you would need to enter Section 05 (the Non-Enrollment discussion class) as the 1st Auto Enroll Section value on your lab classes in this example.
Multiple Discussion & Multiple Lab Example
For a class that has multiple discussions and labs, you can assign a special Associated Class Number so that students can pair any of the class discussions with any of the available labs.
Navigation: Curriculum Management > Schedule of Classes > Update Sections of a Class
Begin with building the primary component of your class; we'll use a discussion component for this example.
- Build your discussion sections and assign Class Section numbers consecutively (i.e., 01, 02 then 03).
- Make sure that the Component value is "Discussion".
- The Class Type value will default as "Enrollment". Leave this default value on all discussion sections.
- Enter an Associated Class number for each discussion section that matches the Class Section number you assigned. (The Associated Class number cannot have a leading zero.)
- Click the plus (+) button on the Basic Data tab after entering each section to begin creating a new section.
Create all of your discussion sections before moving on to create the labs.
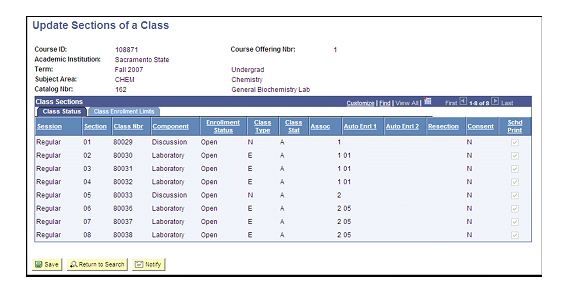
- Assign the next available Class Section number to each lab.
- Change the Component to "Laboratory". If necessary, use the magnifying glass to look up this value.
- The Class Type will default to "Enrollment". Change this value to "Non-Enroll" for all lab sections.
- Enter "9999" for the Associated Class Number on each lab section.
- Click the Save button at the bottom of the page when you have finished entering all lab sections.
Once you have finished scheduling your sections, it may be helpful to look up the class via the Update Sections of a Class page to review the information. Your class should look something like the example shown in the following visual. (Figure 13: Multiple Discussion and Lab Options.)
Three Component Example (Lecture/Lab/Activity)
For a class that groups a single section of three separate components, set your class up according to the instructions below.
Navigation: Curriculum Management > Schedule of Classes UpdateSections of a Class
Start with the component you want the student to select for enrollment; we'll use a lecture in this example.
- Build your lecture class and assign a Class Section number of "01".
- Make sure that the Component value is "Lecture".
- The Class Type value will default as "Enrollment". Leave this default value on the lecture (Section 01).
- The Associated Class number will default to "1". Leave the default value for the lecture.
- Click the plus (+) button to add your next section.
Now build your next component; we'll use a lab section in this example.
- Assign your lab a section number of "02".
- Change the Component value to "Laboratory". Click the magnifying glass to look up the code, if necessary.
- The Class Type will default to "Enrollment". Change this value to "Non-Enroll".
- The Associated Class number will default to "1". Leave this default value alone so that it will match the number on the lecture section.
Now build your third component; we'll use an activity section in this example.
- Assign your activity a section number of "03".
- Change the Component value to "Activity". Click the magnifying glass to look up the code, if necessary.
- The Class Type will default to "Enrollment". Change this value to "Non-Enroll".
- The Associated Class number will default to "1". Leave this default value alone so that it will match the number on the lecture section.
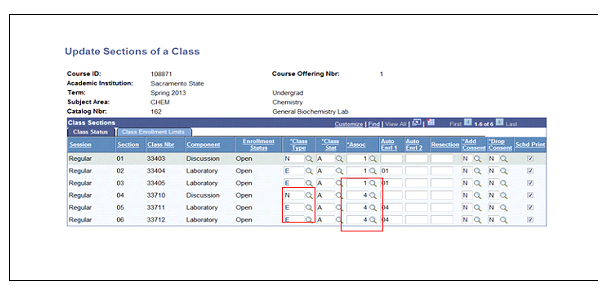
Now complete the Auto Enroll information on Section 01.
- Locate the arrows at the top of the Class Sections box. Click the back arrow until you get to Section 01.
- Click the Enrollment Cntrl tab.
- Enter "02" in the 1st Auto Enroll Section field and "03" in the 2nd Auto Enroll Section field. Now students who enroll in the lecture portion of this class will automatically be enrolled in the lab and activity portions.
- Click the Save button at the bottom of the page.
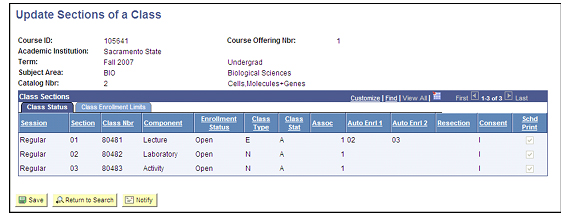
Once you have finished scheduling your sections, it may be helpful to look up the class via the Update Sections of a Class page to review the information. Your class should look something like the example shown in the following visual. (Figure 14: Three Component Example.)
Equivalencies & Combined Sections
Cross-listed terminology does not technically exist in PeopleSoft. Instead, the term "cross-listed" has been replaced with the term "course equivalent". Course Equivalencies are set up in the Course Catalog and roll down to the Schedule of Classes. At the Schedule of Classes level, the following steps need to take place to link the sections of equivalent courses. (The same process applies for any combined sections that meet in the same place even if they are not cross-listed.)
Note: This process copies a meeting pattern to all combined sections so you ONLY ATTACH A MEETING PATTERN ON ONE OF THE CLASS SECTIONS to be combined.
Course sections that have different meeting and time patterns cannot be combined. If course sections need to be grouped with separate meeting and time patterns refer to the Class Associations/Groupings section of the Advanced Scheduling Manual.
All Learning Communities are combined by Academic Affairs. If there are any problems noticed with LCOM courses please contact Academic Affairs.
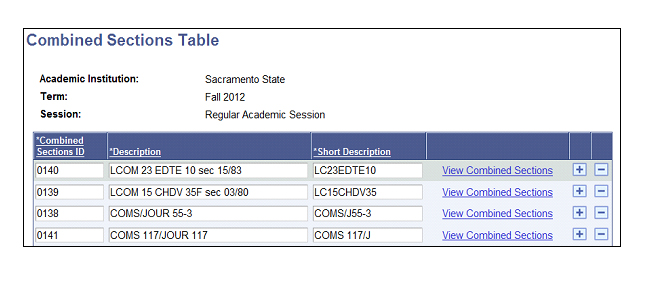
Combined Sections Table
The Combined Sections Table allows you to set up an ID for each set of Combined Sections that you need to establish.
Navigation: Curriculum Management > Combined Sections > Combined Sections Table (Figure 15: Search page.)
- Enter "SACST" for the Academic Institution.
- Enter the appropriate Term Code. Use the magnifying glass to look up the term value, if necessary.
- Select Regular Academic Session from the Session dropdown list.
- Click the Search button.
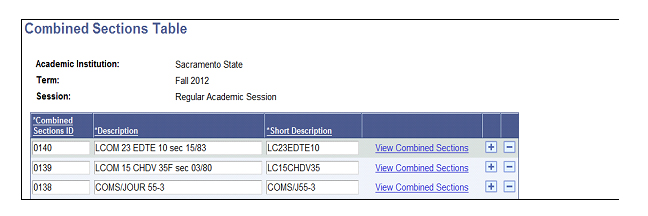
The Combined Sections Table will display all Combined Sections ID's already set up for the Term and Session you specified. (Figure 16: Combined Sections Table.)
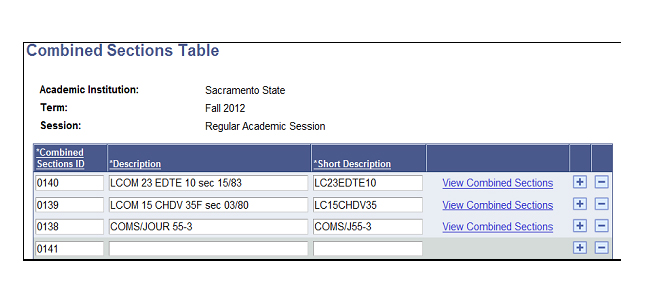
- Click the plus (+) button to insert a new line and add your information. (Figure 17: Adding new Combined Sections ID.)
Note: If you are taken to a blank table you can simply start by filling in the Description field on the existing blank line.
- The Combined Sections ID field will default. Enter a Description to identify your combined sections (32 character limit).
- Enter a Short Description for identification purposes (12 character limit).
- Click the Save button at the bottom of the page. (Figure 18: Saved data.)
Now that you have created a unique ID for your combined sections, you will need to associate the individual class numbers with that ID.
- Notice that a View Combined Sections link is now displayed for the Combined Sections ID you just created. You can click this link and skip to step 7 below or continue with the first instruction below.
Identifying Combined Sections
The Identify Combined Sections option allows you to link the specific class sections that will be combined under each Combined Sections ID. This process must be completed after the Combined Sections ID is created.
Once you link combined sections, all sections adopt the meeting and instructor information from the primary section. (This feature can be disabled by checking the Skip Mtg Pattern & Instr Edit box on the Identify Combined Sections page.)
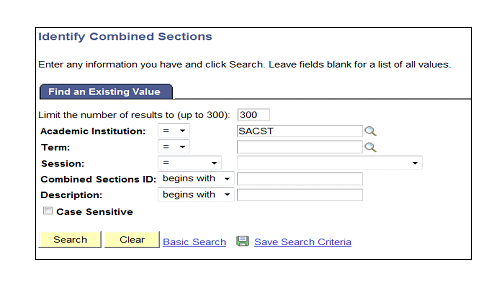
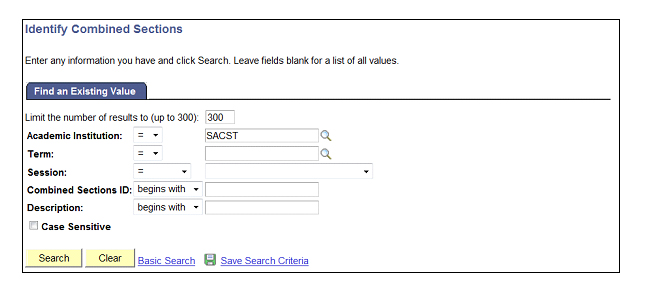
Navigation: Curriculum Management > Combined Sections > Identify Combined Sections (Figure 19: Search page.)
- Enter "SACST" for the Academic Institution.
- Enter the appropriate Term code. Use the magnifying glass to look up the term value, if necessary.
- Select "Regular Academic Session" from the Session dropdown list.
Note: You can also use the Combined Sections ID or Description fields to search by if you know this information.
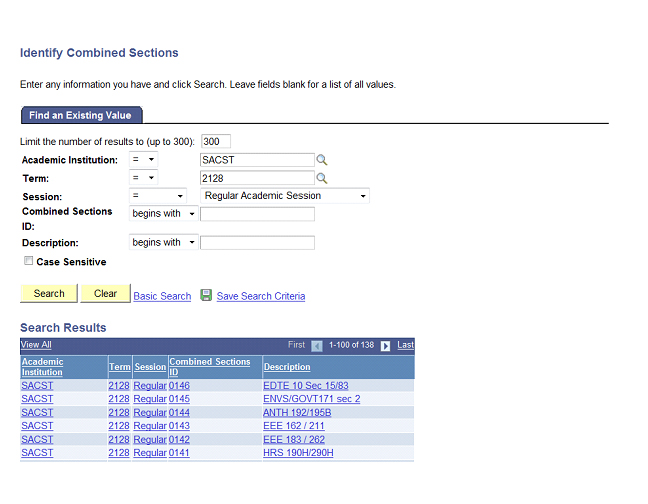
- Click the Search button. (Figure 20: Search results.)
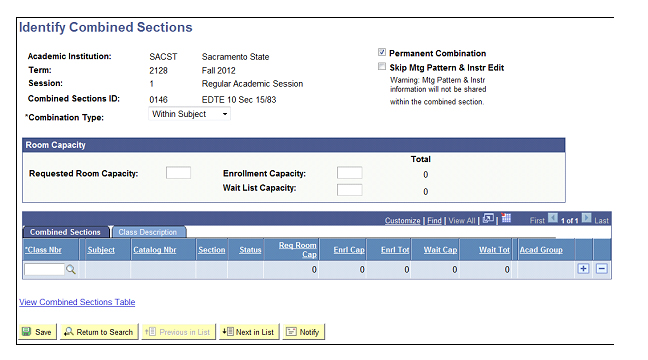
- Depending upon your search criteria, you may have to select your Combined Sections ID from a list of results at the bottom of the page. (The Short Description will display for identification purposes.) (Figure 21: Identify Combined Sections page.)
- Check the Permanent Combination box if you want the system to copy this combination over to the next term when the Prior Term Copy Process is run. If the checkbox is blank, the system assumes this is a one-time combination
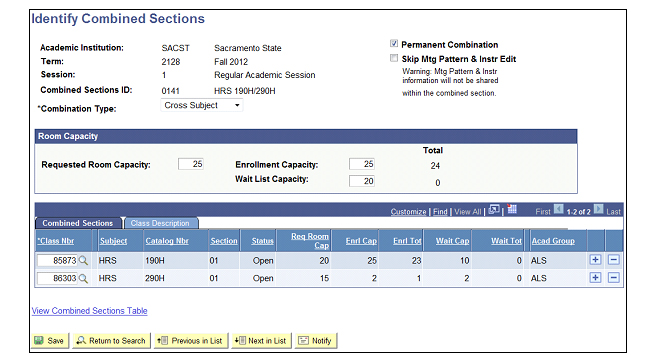
- Use the Combination Type dropdown to select whether this is a "Cross Subject" combination, "Within Subject" combination, or "Both".
- Both is used when there is three or more course sections combined. For example if HRS 1, HRS 101 and HIST 101 were to be combined the Combination Type would be flagged as ‘both’ since two HRS sections are ‘within subject’ with the ‘cross subject’ being the HIST course section.
- Cross Subject is used when the combined sections are derived from two different subjects. For example if HRS 101 and HIST 101 were to be combined the Combination Type would be flagged as ‘cross subject’
- Within Subject is used when the combined sections are derived from the same subjects. For example if HRS 1 and HRS 101 were to be combined the Combination Type would be flagged as ‘within subject’
- At the bottom of the page, click the magnifying glass next to the Class Nbr field to identify the first course.
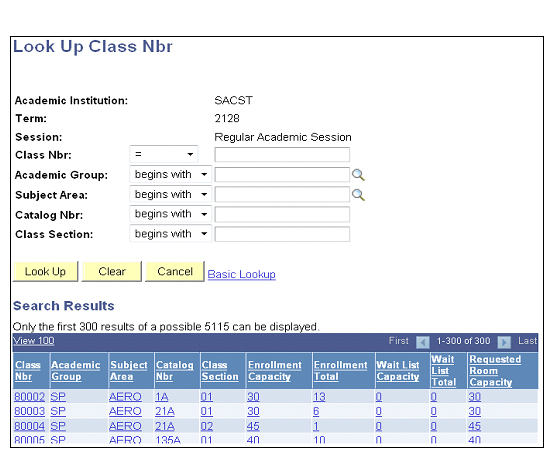
- Enter any necessary search criteria to locate the appropriate course. (Figure 22: Look up Class Nbr)
Note: There is an issue with this Catalog Nbr search field. To search by Catalog Number, enter a percent sign (%) before the number you want to find. This process will return any Catalog Numbers containing the number you entered (e.g., "%10" could return 10, 100, and 110).
- Click the Look Up button.
- Select the desired class section from the list of results.
- You will be returned to the Identified Combined Sections page. Click the plus (+) button to insert a new row and identify the next class.
- Click the Class Nbr magnifying glass in the row you just added.
- Repeat the lookup procedure and select the desired class section.
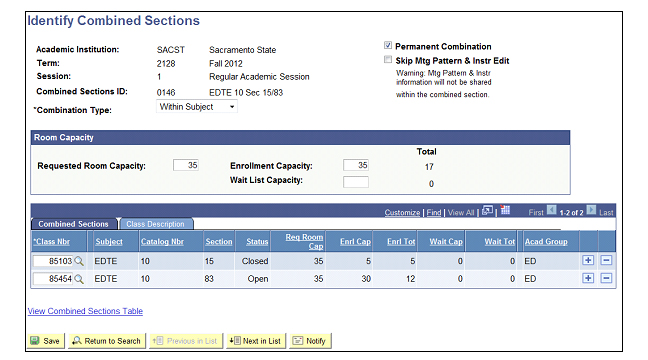
- Continue to add class sections using the plus (+) button to insert as many rows as necessary. (Figure 23: Class sections identified.)
- Enter the capacities for the enrollment and wait list in the Combined Capacities section. (Please refer to wait list guidelines).
Note: The Requested Room Capacity value is not being used for room scheduling; you can leave this field blank
- Click the Save button at the bottom of the page. (Figure 24: Capacities entered.)
As seen in the example above, the Enrollment Capacity and Wait List Capacity values can be set to match the values for the combined class sections. The Combined Capacity values will act as overall capacities for the Combined Sections ID. In other words, a Combined Enrollment Capacity of 30 will allow for a total of 30 enrolled students under the Combined Sections ID (all 30 students may end up in one class section or the enrollment may end up dispersed throughout various sections under the ID).
Updating Combined Sections
If you need to update information for an existing Combined Sections ID, you can navigate to the Identify Combined Sections page.
Navigation: Curriculum Management > Combined Sections > Identify Combined Sections
The plus (+) and minus (-) buttons can then be used to add or remove class sections from the ID.
Once sections have been combined, any changes to the meeting patterns for these classes need to be made on the Schedule Class Meetings page. Meeting patterns for combined sections cannot be accessed under the Schedule New Course or Maintain Schedule of Classes menu options.
Navigation: Curriculum Management > Schedule of Classes > Schedule Class Meetings
Instructor / Advisor Information
Setting up Instructor/Advisor Table
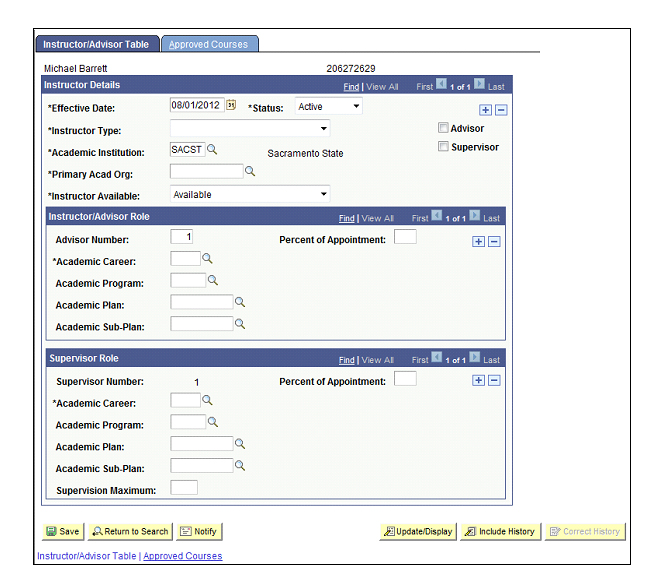
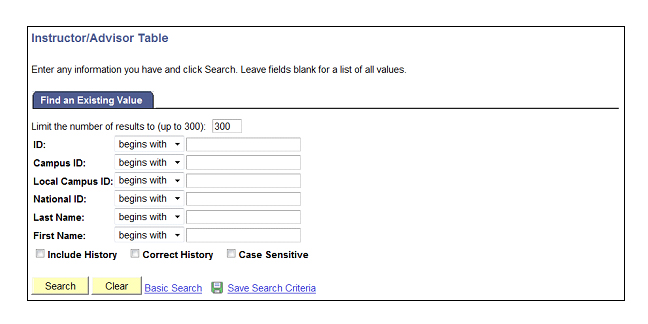
The Instructor/Advisor Table allows you to authorize instructors to teach courses within an Academic Organization. When you have a new instructor teaching in your department, you will need to activate them on the Instructor/Advisor Table (an EmplID must already be assigned by HR). This process must be completed for the instructor to be assigned on the Meetings tab when a course is being scheduled.
Navigation: Curriculum Management > Instructor/Advisor Information > Instructor/Advisor Table
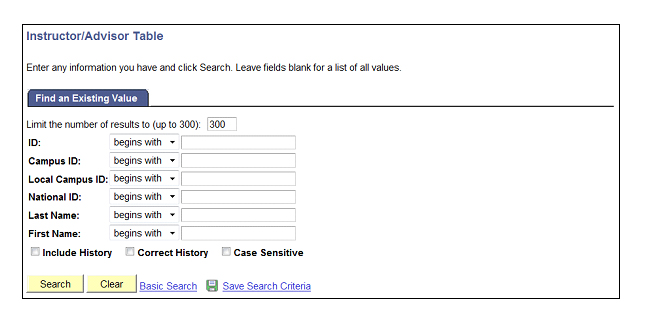
- Enter search criteria to help identify the appropriate instructor. (Figure 25: Search.)
- Click the Search button.
- Depending upon the criteria you entered, you may have to choose from a list of results displayed at the bottom of the screen. (Figure 26: Instructor/Advisor Table.)
- Enter an Effective Date. Make sure the Effective Date matches the standard date for the beginning of the first semester the instructor will teach. (Refer to table)
- Use the Instructor Type dropdown to select the title which best describes the instructor's position.
- Enter "SACST" for the Academic Institution.
- Enter the Primary Acad Org. This value identifies the primary org associated with the instructor; use the magnifying glass to look up the value if necessary.
- Make sure the Advisor checkbox is checked. This option allows individual students to be linked to the instructor for advising purposes.
Effective Fall 2009, departments will no longer need to maintain the information entered in the Instructor/Advisor Role section. A script has been developed to update this information which is run periodically.
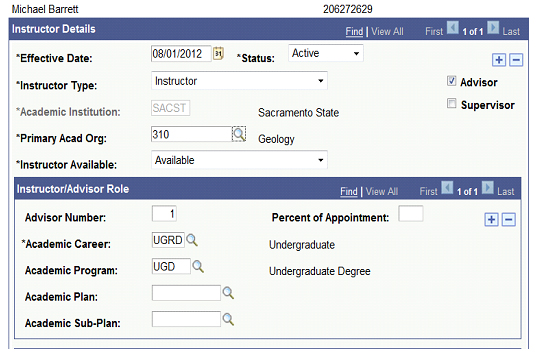
- You have now finished entering data on the Instructor/Advisor Table tab. Click the Approved Courses tab at the top of the page. (Figure 27: Approved Courses tab.)
Now you need to identify the area(s) in which the instructor can teach courses.
- Enter the Academic Org on the blank row. Use the magnifying glass to look up this value if necessary.
Note: Because our campus is authorizing instructors by Academic Org instead of individual course, you will only need to fill in the Academic Org value.
- Click the plus (+) button to add any additional rows and repeat the instructions above to enter course information.
- Click the Save button when you are finished entering all course data.
Effective Dates
SACST has decided to use the following effective dates to represent when courses will begin and end as they relate to terms:
| Term | Begin Date | End Date |
|---|---|---|
| Winter | 01/01/XX | 01/14/XX |
| Spring | 01/15/XX | 05/14/XX |
| Summer | 05/15/XX | 07/31/XX |
| Fall | 08/01/XX | 12/31/XX |

Updating & Inactivating Instructor Information
When an instructor's information changes you will need to update the Instructor/Advisor Table. Never type over existing effective dates (unless you are using Correct History mode to change incorrect data). Instead, insert a new effective dated row. In general, updating and inactivating this instructor information is optional but this process must be completed when an instructor is being authorized to teach in a new Academic Organization.
Navigation: Curriculum Management > Instructor/Advisor Information > Instructor/Advisor Table
- Enter search criteria to help identify the appropriate instructor. (Figure 28: Search page.)
- Click the Search button.
Note: Depending upon the criteria you entered, you may have to choose from a list of results displayed at the bottom of the screen. (Figure 29: Existing instructor data.)
Editing Incorrect Data
- Click the Correct History button to edit information that was entered incorrectly.
- Make the appropriate changes and click the Save button to complete the process.
Updating with new Information
- For updates to instructor information, you will need to click the plus (+) button in the Instructor Details box to insert a new row.
- Add the new information and make sure that the Effective Date is appropriate.
Note: You can add to the Academic Org's an instructor can teach under by clicking the plus (+) button on the Approved Courses tab. (This step can only be done after you have inserted a new row using the plus button in the Instructor Details box.)
- Click the Save button to complete the process.
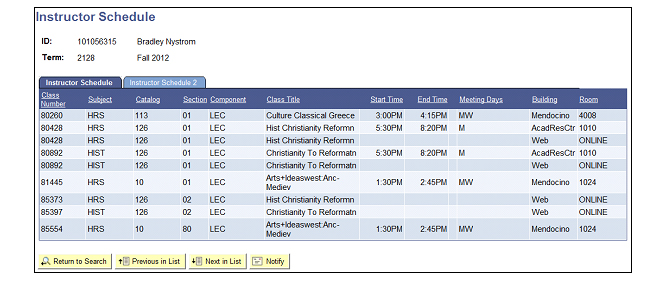
Instructor Schedules
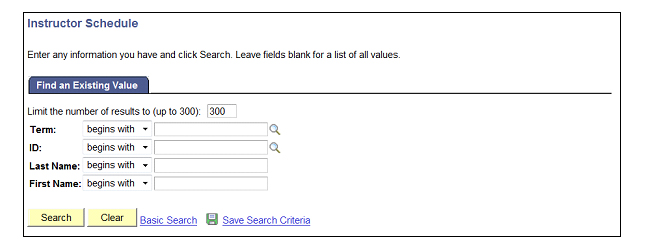
The Instructor Schedule option under Curriculum Management allows you to quickly look up a list of the classes an instructor is teaching during a specific term.
Navigation: Curriculum Management > Instructor/Advisor Information > Instructor Schedule (Figure 31: Instructor Schedule.)
- Enter the desired Term value. Use the magnifying glass to look up the term value, if necessary. (Figure 30: Search page.)
- Enter further criteria to help identify the appropriate instructor.
- Click the Search button.
- Depending upon the criteria you entered, you may have to choose from a list of results displayed at the bottom of the screen.
The Instructor Schedule page displays information about each class the instructor is teaching.
- You can use your browser's print functionality (File > Print) to generate a paper copy of the schedule, if desired.
- If you would like to view the scheduled Start and End dates for the classes listed, click the Instructor Schedule 2 tab. (Figure 32: Instructor Schedule 2 tab.)

APPENDIX A: eLearning Courses
Meeting Pattern Issues and Setup Examples
There are a variety of delivery modes for eLearning Courses, including online, hybrid (some online and some in-person), televised (an in-person section is televised simultaneously to other sites on or off campus), and Web Assisted (SacCT).
The campus has experienced issues with online courses that have been scheduled in a room for the entire semester, but because of the online nature of the course, the room is unoccupied much of the time. This can result in less efficient use of classroom space and block the availability of rooms that can be used for other classes or events during the semester.
New features in CMS have been implemented to allow the system to reflect the online portions of a course without occupying a classroom. A Facility ID code of ‘WEBONLINE’ has been defined and can now be assigned to the online portion of a course rather than a room being assigned.
The following are examples of the most common types of eLearning courses and how they should be set up on the Basic Data and Meetings screens in CMS. This will ensure that facilities are used effectively and students are informed of the delivery mode for the course section in the Class Search.
Example 1: Online Courses with No Classroom Time
The following is an example of a course that is delivered entirely online and does not occupy a classroom. The section is setup with no days or times and the Facility ID is entered as WEBONLINE. (Figures 33 & 34: Example 1 - Online Course with no classroom time.)
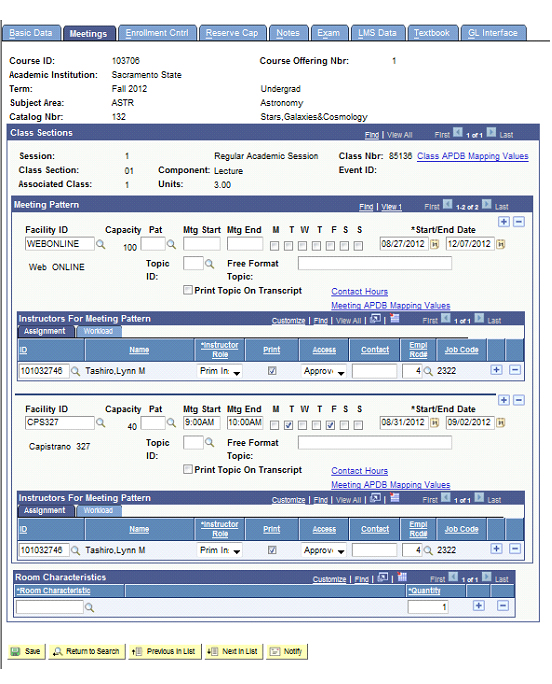
Example 2: Online Courses with Partial Classroom Time
Some courses are online, but require an organizational meeting during the first week of instruction. This requires a classroom to be scheduled, but the classroom is only needed during the first week of instruction.
The following is an example of how this situation should be scheduled. The section has two meeting patterns. Additional meeting patterns can be created by clicking the plus symbol in the Meeting Pattern section. (Figures 35 & 36: Example 2 – Online Course with partial classroom time.)
- The first meeting pattern displays a Facility ID of WEBONLINE for the term dates of 8/30/2010 to 12/10/2010.
- The second displays a Facility ID for the physical location of the classroom. In this example the class meets in CPS 327. The dates will reflect only the first week of instruction; Tue. and Thurs. from 8/31/2010 to 9/2/2010.
- A final reminder regarding sections with more than one meeting pattern: only the first meeting pattern should have the Assign Type=IFF on the Instructors for Meeting Pattern>Workload Tab. All other meeting patterns should have Assign Type set to ‘Not Include
Example 3: Online Courses with Weekly Classroom Time
This example illustrates a course meeting one day per week in a classroom, and the rest of the time online. The course has two meeting patterns. (Figures 37 & 38: Example 3 – Online courses with weekly classroom time.)
- The first meeting pattern Facility ID is WEBONLINE. The days are set to Thursdays from 8/30/2010 to 12/10/2010 for the entire term.
- The second meeting pattern Facility ID is RVR 1006. The days are set to Tuesdays only from 8/30/2010 to 12/10/3010 for the entire term. The meeting pattern must show that the section is assigned to a room for the entire term. Space Management will look at the meeting pattern in the final exam scheduling process to determine whether a final needs to be scheduled.
Example 4: Classroom with Televised Feed
If a classroom is scheduled to receive a simulcast televised feed from another instructor led classroom, these classrooms are often only used for a short time early in the semester and are unoccupied for the majority of the semester. If the unoccupied dates for these types of sections could be identified in advance, the meeting pattern for the course could be modified to indicate only the dates when the classroom is occupied. The appropriate “Course Attribute Value” is ‘TV’.