Support Page Content
Geography Computer Labs
Accessing Campus GIS Resources
Students, faculty, and staff at Sacramento State have access to an array of shared data, file storage, and GIS software resources through the campus, including Esri's ArcGIS Pro suite. You can use ArcGIS Pro on any computer in a University lab, or can download the software on a personal computer (see instructions below).
Please be aware this is an educational site license and limited to teaching and research-related activities. Commercial use of the licensing described below is explicitly prohibited.
Note: If you find any discrepancies or problems in the various procedures here, please notify your instructor or the CSUS Esri Campus Administrator who is the custodian of this document. The current Administrator can be contacted through the CSUS Geography Department.
ArcGIS Pro Licensing
Setting up your named account
- Go to https://csus.maps.arcgis.com and click "Sign In" in the upper right corner. This will take you to the initial Sign In screen
- Click on the button “Log in with your SacLink Account” (Figure 1). This will take you to the Sacramento State Single Sign-On (SSO) page for the next step
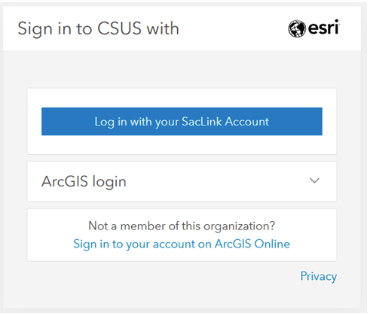
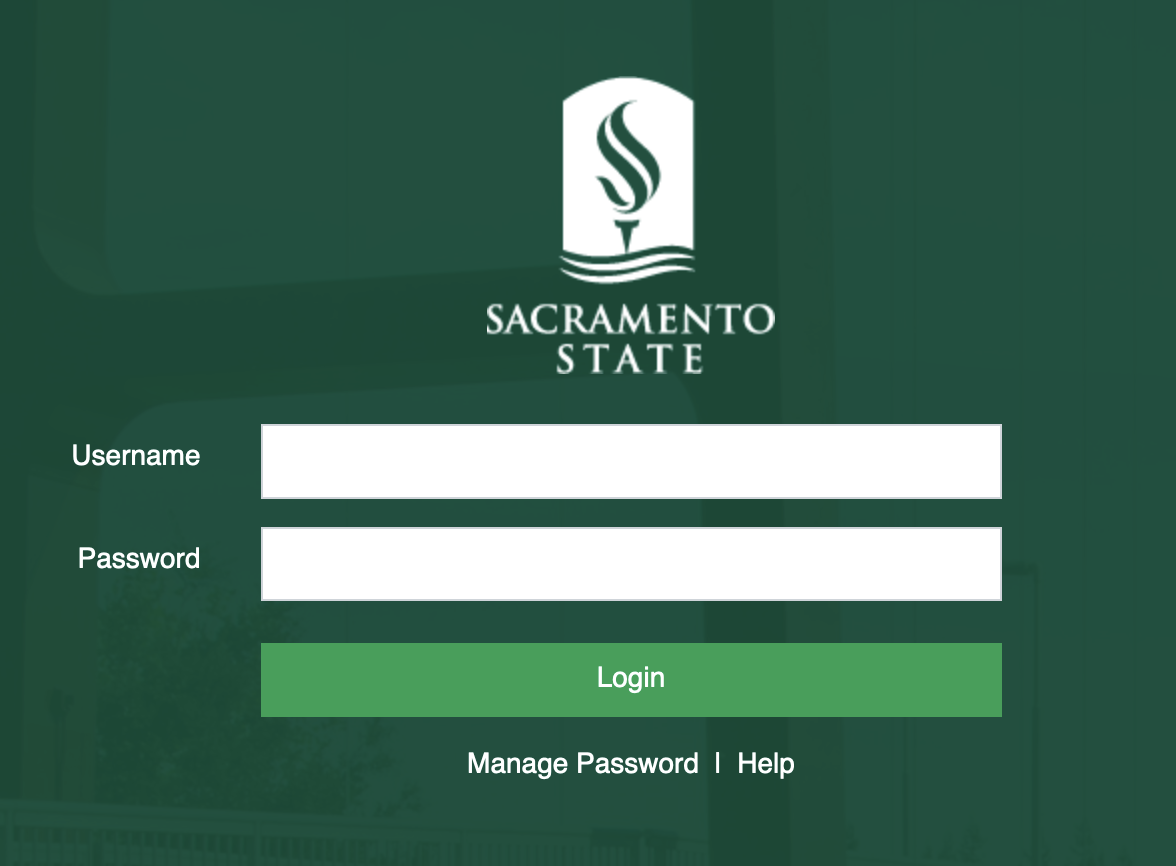
Figure 1. Initial Esri Signin page. Click "Log in with your SacLink Account" - Enter your SacLink username and password on the SSO page (Figure 2). This will log you into the CSUS's ArcGIS Online, and automatically issue an ArcGIS Pro license and assign default extensions to your account.
- You are now ready to log into ArcGIS Pro
Log in to ArcGIS Pro (required starting Oct 1, 2024)
- Launch ArcGIS Pro
- If you are automatically asked to login, skip to Step #4
- In the top right corner of ArcGIS Pro, click "Sign In"
-
Select "Your ArcGIS organization's URL" (Figure 2). This will make a text box available
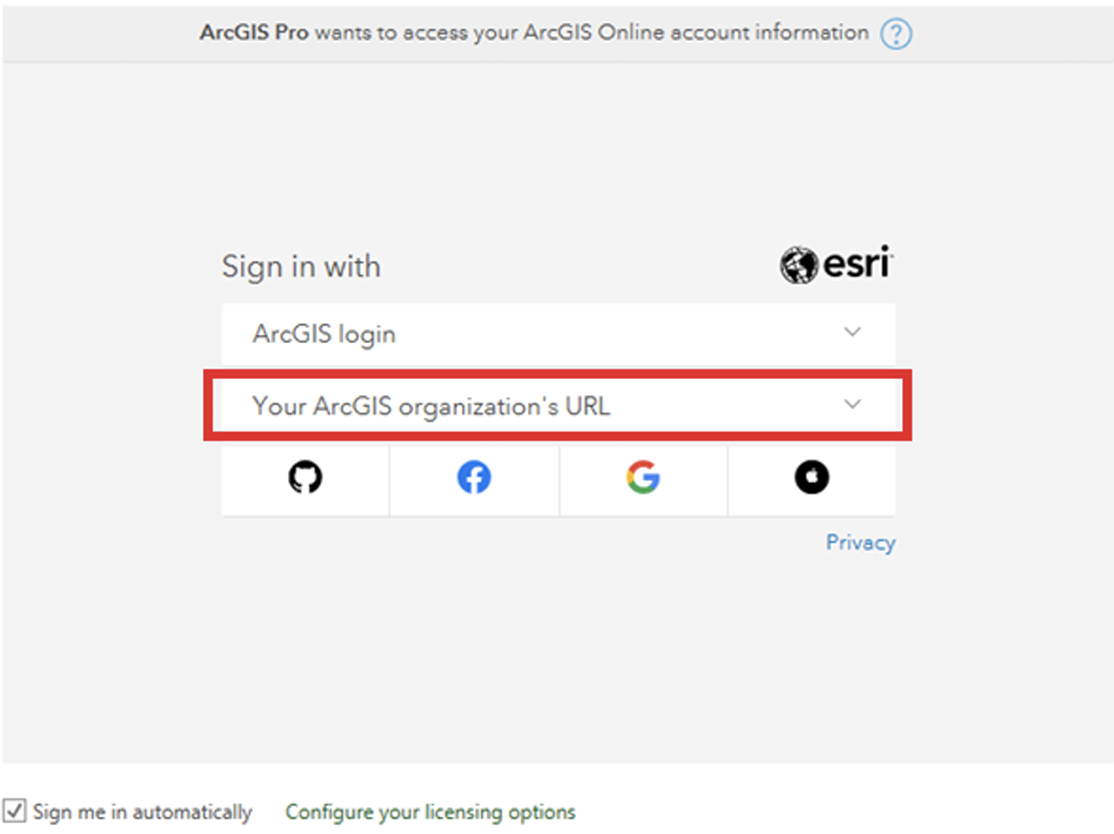
Figure 2. Initial sign-in screen -
In the text box, type "csus" then click "Continue". If on a personal device, check the "Remember this URL" box
Figure 3. Entering your ArcGIS organization's url (csus)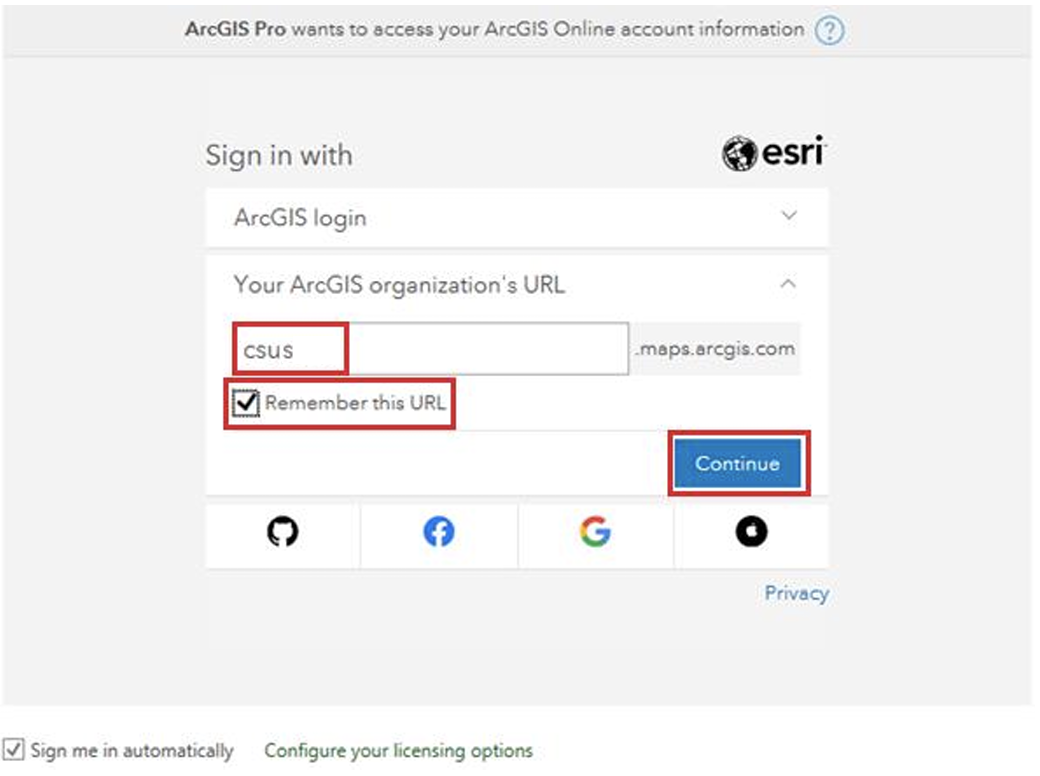
- Log in with your SacLink username and password
- Once logged in you will see your name replace "Sign In" in the top right corner for ArcGIS Pro
ArcGIS Software Installation on your Own Computer
This option is for those who have access to a computer on which they can install GIS software. ArcGIS requires a Windows operating system (OS). On a Mac this can be done using BootCamp or a virtual machine (ex: Parallels, VMWare) running Windows. Directions on how to run ArcGIS Pro on a Mac, as well as recommended system requirements.
System Requirements
Recommended Versions for Installation
- ArcGIS Pro: version 3.5 [here]
The recommended version above matches the installed versions of the software in the campus computer labs. If you install different versions on your personal computer you may have difficulty completing your assignments as directed by your instructors. WE STRONGLY RECOMMEND INSTALLING THE RECOMMENDED VERSION and not upgrading for the entire academic year.
ArcGIS Pro Installation: 2 steps
Video Walkthrough: Installing and Licensing ArcGIS Pro
Download and install
- Download the ArcGIS Pro installation file from here
- Sign in with your SacLink Account.
- Download and open/run the executable (.exe) file.
- Accept the terms, choose the “Install for all users” option, and opt out of “Participate in the ESRI Experience” option.
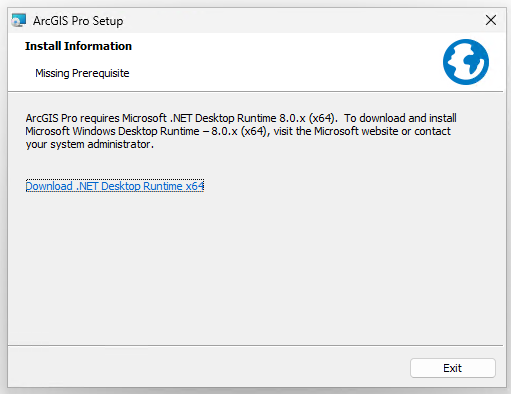
- Possible issue: Depending on your version of Windows OS you may get a popup window about a missing requirement for Microsoft .NET Desktop Runtime requirement in the "Download and install" instructions section
-
Click on the "Download .NET Desktop Runtime x64" link. This will take you to Microsoft's page
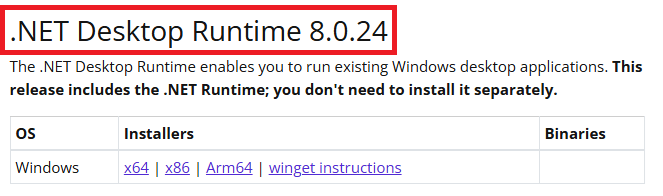
-
Scroll down the page to ".NET Desktop Runtime 8.0.24" and select the appropriate download file.
- If you don't know which processor your computer has (x64, x86, Arm64), watch the video "Windows 11: Check if CPU is ARM64 or X64 (64-bit)" at: https://www.youtube.com/watch?v=Z_lcEqomG0k
- Install the downloaded file, then retry your ArcGIS Pro installation
-
Licensing
Follow the directions in the "ArcGIS Pro Licensing" section above
Access the Campus Network Through GlobalProtect
GlobalProtect is the Virtual Private Network (VPN) service used by Sacramento State. You can use GlobalProtect to access CSUS network resources, including shared drives on campus servers and GIS software installed on Geography laboratory computers. GlobalProtect requires access to a computer or tablet with internet access, and can be run on machines using Windows, macOS, Linux, and Android operating systems. Follow the instructions below corresponding to your local machine’s operating system to install GlobalProtect. You can also find these instructions (including those for Linux) here.
NOTE: Always remember to disconnect from the VPN when not accessing campus resources to prevent your local internet speed from being impacted.
Find what version of Windows (32-bit or 64-bit) you're on.
- Click the Start Menu in the bottom right corner and type "About your PC".
- Click on the About your PC icon that appears.
- Under Device specifications, find your Windows version where it says System type.
- Go to CSUS's IRT Software Catalog at https://www.csus.edu/information-resources-technology/software-catalog/ and filter for "GlobalProtect VPN"
- Download the correct version for your operating system
- Locate and double-click the downloaded file to launch the GlobalProtect installer.
- Click Install and proceed through the acknowledgment prompts.
- After installing, GlobalProtect will automatically launch.
- Enter vpn.csus.edu for your portal address and click Connect.
- To disconnect, click on the GlobalProtect icon in the bottom right corner of your task bar.
- To reconnect in the future, click on the GlobalProtect icon in the bottom right corner of your task bar.
- Download and launch the macOS GlobalProtect installer (you will be prompted to sign in using your SacLink Account).
- Proceed through the prompts and acknowledgments.
- Click the Apple icon in the top left of your screen, select System Preferences.
- Click on Security & Privacy.
- Click the gold lock at the bottom of the security window.
- Enter your macOS / Apple ID password.
- If you see the message, System software from developer "Palo Alto Networks" was blocked from loading, click the Allow button.
- GlobalProtect will then launch automatically. Enter vpn.csus.edu and click Connect.
- To disconnect, click on the GlobalProtect icon that installed in the top right corner of your screen (located to the left of the date/time).
- To connect in the future, click on the GlobalProtect icon installed in the top right corner.
Android
- On Google Play, search for and install GlobalProtect (Palo AltoNetworks).
- Open Google Protect and under “What’s your portal address” enter vpn.csus.edu.
- Press the blue “Connect” button (you will be prompted to sign in using your SacLink Account).
- If you get a window titled “Connection Request” click “OK” to connect.
- To disconnect, tap the green shield.
Managing Personal Files Through GlobalProtect
Accessing the University U: Drive on your Computer
In order to access the university U: drive from your own computer, you must map it as a network drive and log in with the appropriate credentials via GlobalProtect. Follow the appropriate set of directions below to map to this location from a computer with Windows or macOS operating systems.
- Install & connect GlobalProtect if you haven't already done so.
- Refer to the Access the Campus Network through GlobalProtect section of this document for instructions on how to install and connect through GlobalProtect.
- If you have already installed GlobalProtect, use csus.edu as your portal address to connect to the campus network.
- Open the File Explorer.
- Right-click “This PC” on the left side of the File Explorer, and click Map Network Drive.
- Choose an appropriate drive letter (“U” is suggested).
- Enter the following as the Folder: \\sacfiles1.saclink.csus.edu\home\u\someuser (substituting your SacLink user name where it says “someuser” and the first letter of your username where it says "u" after "\home\").
- Check whether to reconnect at sign-in or not.
- Click Finish.
- If you're asked, enter your SacLink email for your username and use your SacLink Account password.
macOS
- Install & connect GlobalProtect if you haven't already done so.
- Refer to the Access the Campus Network through GlobalProtect section of this document for instructions on how to install and connect through GlobalProtect.
- If you have already installed GlobalProtect, use csus.edu as your portal address to connect to the campus network.
- Open Finder.
- At the top left left of the screen click Go and Connect to Server.
- Map the following drive smb://sacfiles1.saclink.csus.edu/home/u/someuser (substituting your SacLink user name where it says “someuser”).
- Click the + Add icon and paste your server address into the Server Address field.
- On the next screen, select "Registered User."
- Enter your SacLink Username in the Name: field.
- Enter your SacLink Password in the Password: field.
- Select the server you just added to your favorite servers and click Connect.
The U: drive will now be available for use on your local computer. When you are signed into GlobalProtect, you can use it just like any other drive on your computer. You can save files to the U: drive using any program on your local computer. And you can use your file manager (Windows: File Explorer, macOS: Finder) to copy or move files in and out of the U drive so they can pass between the university computer system and your own computer.
Access the Shared Drive for Classroom Resources
There are various methods used to distribute data for GIS courses. Some instructors are providing their class with datasets through Canvas. Others are distributing datasets through ArcGIS Online groups. Still others are providing datasets through the shared geog drive. Verify with your instructor which approach they are using. If they are using the shared geog drive, follow these instructions to access that data from your local computer or from a campus computer that you have connected to via GlobalProtect. Follow the appropriate directions below to map to the shared geog drive.
Windows
- Install & connect GlobalProtect if you haven't already done so.
- Refer to the Access the Campus Network through GlobalProtect section of this document for instructions on how to install and connect through GlobalProtect.
- If you have already installed GlobalProtect, use csus.edu as your portal address to connect to the campus network.
- Open the File Explorer.
- Right-click “This PC” on the left side of the File Explorer, and click Map Network Drive.
- Choose an appropriate drive letter (“S” is suggested).
- Enter the following as the Folder: [GET INFO FROM YOUR GIS PROFESSOR]
- Check whether to reconnect at sign-in or not.
- Click Finish.
macOS
- Install & connect GlobalProtect if you haven't already done so.
- Refer to the Access the Campus Network through GlobalProtect section of this document for instructions on how to install and connect through GlobalProtect.
- If you have already installed GlobalProtect, use csus.edu as your portal address to connect to the campus network.
- Open Finder.
- At the top left left of the screen click Go and Connect to Server.
- Map the following drive:
- GET INFO FROM YOUR GIS PROFESSOR
- Click the + Add icon and paste your server address into the Server Address field.
- Select the server you just added to your favorite servers and click Connect.
The S drive will now be available for use on your local computer. When you are signed in to GlobalProtect, you can use the S drive like any other drive on your computer, accessing it from programs including your file management software (Windows: File Explorer, macOS: Finder).