Support Page Content
Advanced Class Scheduling Manual: Class Associations & Groupings
Table of Contents
Process Overview
For enrollment purposes, the Associated Class Number is used to link all class sections that constitute a single course offering. For example, if you are scheduling one lecture component with multiple lab sections from which a student can choose, all lab sections of the course offering need to have the same Associated Class Number as the lecture component.
These associations/groupings need to be adjusted to dictate which sections must be taken together and, to complete the process, enrollment controls need to be set. If a student has multiple options as to the lab they can take with a lecture, the labs will have a Class Type of "Enrollment" and the lecture will have a Class Type of "Non-Enroll". The Auto Enroll feature can then be set so that the student selects a lab section and the system automatically enrolls them into the only lecture available for that lab.
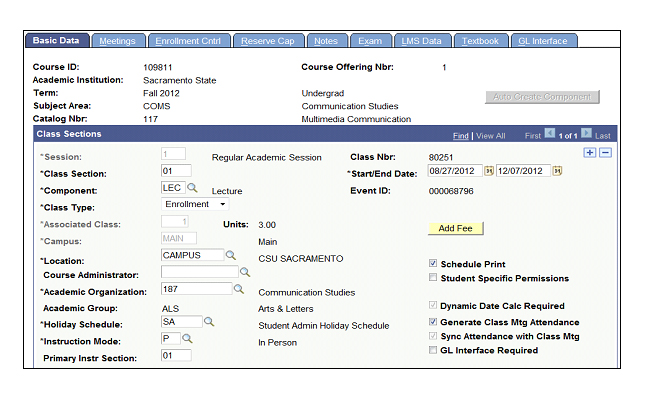
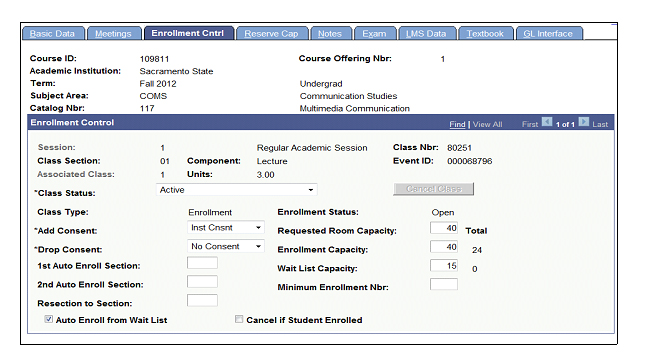
Highlighted in the following visuals are the key fields for setting up Class Associations. (Figure 7: Basic Data tab, Figure 8: Enrollment Cntrl tab.)
Navigation: Curriculum Management > Schedule of Classes > Schedule New Course or Maintain Schedule of Classes
Single Component Class Example
For a basic class that has only one component (e.g., Lecture or Discussion), set your class up according to the instructions below.
Navigation: Curriculum Management > Schedule of Classes > Update Sections of a Class
- Build your sections and assign Class Section numbers consecutively (i.e., 01, 02 then 03).
- The Component field will default.
- The Class Type value will default as "Enrollment". Leave this default value on all sections.
- Enter an Associated Class number for each section that matches the Class Section number you assigned. (The Associated Class number cannot have a leading zero.)
- Click the plus (+) button on the Basic Data tab after entering each section to begin creating a new section.
- Click the Save button.
Once you have finished scheduling your sections, it may be helpful to look up the class via the Update Sections of a Class page to review the information. Your class should look something like the example shown in the following visual. (Figure 9: Single Component Class.)

Single Discussion & Lab Example
For a class with a single discussion and lab that must be taken together, set your class up according to the instructions below.
Navigation: Curriculum Management > Schedule of Classes > Update Sections of a Class
- Build your discussion class first and assign a Class Section number of "01".
- Make sure that the Component value is "Discussion".
- The Class Type value will default as "Enrollment". Leave this default value on the discussion (Section 01).
- The Associated Class number will default to "1". Leave the default value for the discussion.
- Click the plus (+) button to add your next section.
- Now build your lab class and assign a Class Section number of "02".
- Change the Component value to "Laboratory". Click the magnifying glass to look up the code, if necessary.
- Change the Class Type from "Enrollment" to "Non-Enroll".
- The Associated Class number will default to "1". Leave this default value alone so that it will match the number on the discussion section.
- Locate the arrows at the top of the Class Sections box. Click the back arrow to go to section 01.
- Click the Enrollment Cntrl tab.
- Enter "02" in the 1st Auto Enroll Section field. Now students who enroll in the discussion portion of this class will automatically be enrolled in the lab section.
- Click the Save button at the bottom of the page.
Once you have finished scheduling your sections, it may be helpful to look up the class via the Update Sections of a Class page to review the information. Your class should look something like the example shown in the following visual. (Figure 10: Single Discussion and Single Lab.)
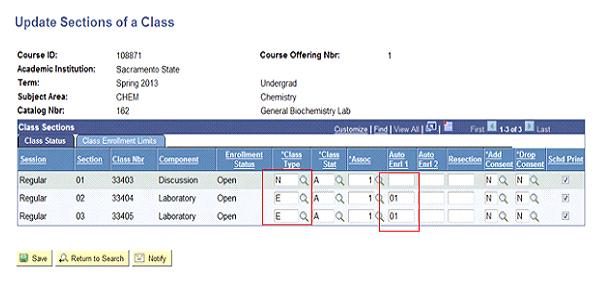
Single Discussion & Multiple Lab Example
For a class with a single discussion and multiple labs for students to choose from, set your class up according to the instructions below.
Navigation: Curriculum Management > Schedule of Classes > Update Sections of a Class
- Build your discussion class and assign a Class Section number of "01".
- Make sure that the Component value is "Discussion".
- The Class Type value will default as "Enrollment". Change this value to "Non-Enroll".
- The Associated Class number will default to "1". Leave the default value for the discussion.
- Click the plus (+) button to add your next section.
Now build your lab classes by following the instructions below.
- Assign consecutive Class Section numbers to your labs beginning with "02".
- Change the Component value to "Laboratory". Click the magnifying glass to look up the code, if necessary.
- The Class Type will default to "Enrollment". Leave this default value for all lab sections.
- The Associated Class number will default to "1". Leave this default value alone so that it will match the number on the discussion section.
- Click the Enrollment Cntrl tab.
- Enter "01" in the 1st Auto Enroll Section field. Now students enrolling in the lab section of this class will automatically be enrolled in the discussion section.
- Return to the Basic Data tab and click the plus (+) button to add any additional lab sections.
- Click the Save button when you have finished entering all necessary lab sections.
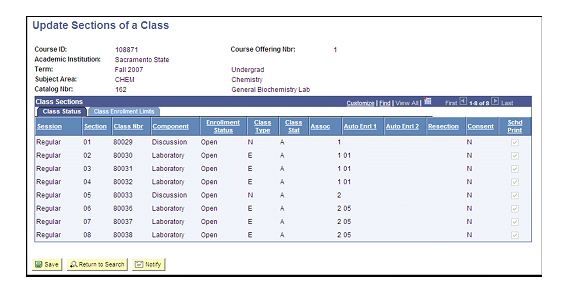
Once you have finished scheduling your sections, it may be helpful to look up the class via the Update Sections of a Class page to review the information. Your class should look something like the example shown in the following visual.
If you have additional discussion/lab groupings for a single class, you can repeat the process above. Start with the next available Class Section number and assign the next available Associated Class number. For example, if you built one group of classes and left off at Section 04, begin with Section 05 and use Associated Class Number 2. Also note that you would need to enter Section 05 (the Non-Enrollment discussion class) as the 1st Auto Enroll Section value on your lab classes in this example.
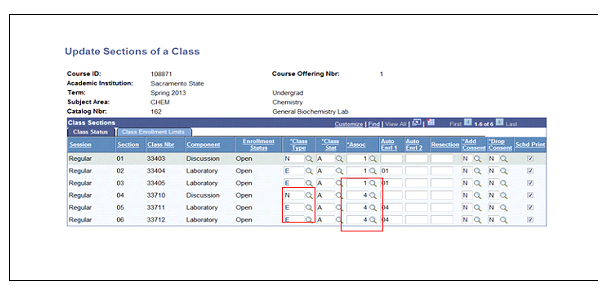
Multiple Discussion & Multiple Lab Example
For a class that has multiple discussions and labs, you can assign a special Associated Class Number so that students can pair any of the class discussions with any of the available labs.
Navigation: Curriculum Management > Schedule of Classes > Update Sections of a Class
Begin with building the primary component of your class; we'll use a discussion component for this example.
- Build your discussion sections and assign Class Section numbers consecutively (i.e., 01, 02 then 03).
- Make sure that the Component value is "Discussion".
- The Class Type value will default as "Enrollment". Leave this default value on all discussion sections.
- Enter an Associated Class number for each discussion section that matches the Class Section number you assigned. (The Associated Class number cannot have a leading zero.)
- Click the plus (+) button on the Basic Data tab after entering each section to begin creating a new section.
Create all of your discussion sections before moving on to create the labs.
- Assign the next available Class Section number to each lab.
- Change the Component to "Laboratory". If necessary, use the magnifying glass to look up this value.
- The Class Type will default to "Enrollment". Change this value to "Non-Enroll" for all lab sections.
- Enter "9999" for the Associated Class Number on each lab section.
- Click the Save button at the bottom of the page when you have finished entering all lab sections.
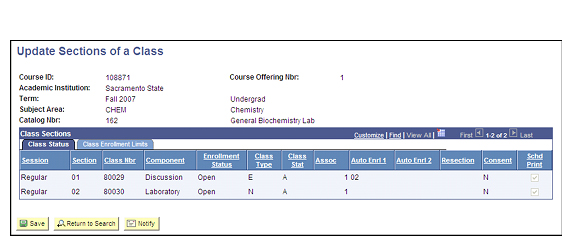
Once you have finished scheduling your sections, it may be helpful to look up the class via the Update Sections of a Class page to review the information. Your class should look something like the example shown in the following visual. (Figure 13: Multiple Discussion and Lab Options.)
Three Component Example (Lecture/Lab/Activity)
For a class that groups a single section of three separate components, set your class up according to the instructions below.
Navigation: Curriculum Management > Schedule of Classes UpdateSections of a Class
Start with the component you want the student to select for enrollment; we'll use a lecture in this example.
- Build your lecture class and assign a Class Section number of "01".
- Make sure that the Component value is "Lecture".
- The Class Type value will default as "Enrollment". Leave this default value on the lecture (Section 01).
- The Associated Class number will default to "1". Leave the default value for the lecture.
- Click the plus (+) button to add your next section.
Now build your next component; we'll use a lab section in this example.
- Assign your lab a section number of "02".
- Change the Component value to "Laboratory". Click the magnifying glass to look up the code, if necessary.
- The Class Type will default to "Enrollment". Change this value to "Non-Enroll".
- The Associated Class number will default to "1". Leave this default value alone so that it will match the number on the lecture section.
Now build your third component; we'll use an activity section in this example.
- Assign your activity a section number of "03".
- Change the Component value to "Activity". Click the magnifying glass to look up the code, if necessary.
- The Class Type will default to "Enrollment". Change this value to "Non-Enroll".
- The Associated Class number will default to "1". Leave this default value alone so that it will match the number on the lecture section.
Now complete the Auto Enroll information on Section 01.
- Locate the arrows at the top of the Class Sections box. Click the back arrow until you get to Section 01.
- Click the Enrollment Cntrl tab.
- Enter "02" in the 1st Auto Enroll Section field and "03" in the 2nd Auto Enroll Section field. Now students who enroll in the lecture portion of this class will automatically be enrolled in the lab and activity portions.
- Click the Save button at the bottom of the page.
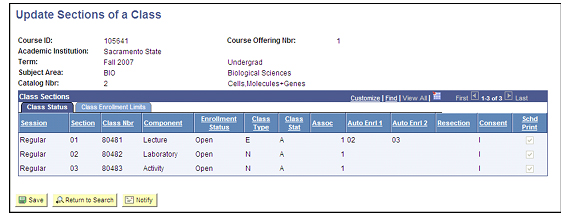
Once you have finished scheduling your sections, it may be helpful to look up the class via the Update Sections of a Class page to review the information. Your class should look something like the example shown in the following visual. (Figure 14: Three Component Example.)